Categories
Technology

Redis

What is Redis?

Redis is an open-source, in-memory data structure store that may be used as a database, cache, or message broker. It supports several data structures including strings, hashes, lists, sets, sorted sets, bitmaps, hyper loglogs, and geospatial indexes. Redis is characterized by its performance, simplicity, and versatility.

Key Features of Redis

  • In-Memory Data Store: Held in memory, with ultra-fast read and write operations.
  • Persistence: Offers methods such as snapshotting and append-only file (AOF).
  • Data Structures: Supports strings, hashes, lists, sets, sorted sets, bitmaps, and more.
  • Pub/Sub Messaging: Allows for real-time messaging and notifications.
  • High Availability: Implements Redis Sentinel for monitoring and fail-over.
  • Cluster Support: Goes all the way towards data distribution across multiple nodes with Redis Cluster.
  • Extensibility: Provides for modules of custom commands and functionality.
  • Lua Scripting: Can execute Lua scripts natively on the server. Atomic Operations: Commands like increment, decrement, and list operations are atomic in nature.
  • Replication: Provides for master-slave replication, thus making sure data is not lost in case of failure, which can easily scale to higher data.

Uses of Redis

  • Caching: Stores frequently accessed data to decrease database load and latency.
  • Session Management: User sessions in web applications can be managed.
  • Real-time Analytics: It is capable of handling real-time data streams like user activity or stock prices tracking.
  • Leaderboards: This helps to build a real-time ranking system by making use of sorted sets.
  • Message Queues: This can act as a lightweight message broker.
  • Geospatial Indexing: It stores and queries geospatial data in an efficient way.
  • Pub/Sub Systems: One can use this to build a chat application, notification, or live feeds.
  • Machine Learning: Serve pre-computed ML models and features.
  • Gaming Applications: Manage game states, leaderboards, and matchmaking.

How to Implement Redis

1. Installation

  • Linux: Use apt-get install redis or yum install redis.
  • macOS: Install via Homebrew: brew install redis.
  • Windows: Use WSL or download from third-party Redis for Windows projects.

2. Basic Commands

  • Start Redis server: redis-server
  • Connect using the CLI: redis-cli
  • Common commands:
    a) SET key value: Set a value.
    b) GET key: Retrieve a value.
    c) DEL key: Delete a key.
    d) EXPIRE key seconds: Set expiration time.
    e) INCR key: Increment value

3. Config

Modify the redis.conf configuration for parameters, such as Persistence: Persist to AOF by append only yes. Security: Add a password using the requirepass. Max Memory: Specify limitations with max memory and eviction strategies. Log: Configure levels and logfiles.

4. Client libraries Redis supports many client libraries in multiple languages such as Python (redis-py), Node.js (ioredis), Java (Jedis), and PHP (Predis or phpredis).

Redis in Laravel Framework

Redis is neatly supported in Laravel because Laravel supports Redis out of the box.

  1. Prerequisites

Install Redis on your system and ensure that Redis is running.

2. Installation of PHP Redis Extension

You can install the PHP Redis extension by using the following command: Linux/macOS: pecl install redis Windows: Copy the Redis DLL to the PHP extensions folder and uncomment it in php.ini.

3. Laravel Configuration

Add Redis to the config/database.php file:

'redis' => [

 'client' => env('REDIS_CLIENT', 'phpredis'),

 'default' => [

'host' => env('REDIS_HOST', '127.0.0.1'),

'password' => env('REDIS_PASSWORD', null),

'port' => env('REDIS_PORT', 6379),

'database' => env('REDIS_DB', 0),

 ],

'cache' => [

 'host' => env('REDIS_HOST', '127.0.0.1'),

 'password' => env('REDIS_PASSWORD', null),

 'port' => env('REDIS_PORT', 6379),

 'database' => env('REDIS_CACHE_DB', 1),

 ],

 ],

Update the .env file:

  • REDIS_CLIENT=phpredis
  • REDIS_HOST=127.0.0.1
  • REDIS_PASSWORD=null
  • REDIS_PORT=6379
  • REDIS_DB=0
  • REDIS_CACHE_DB=1

Usage in Laravel

Caching:

  • Cache::store(‘redis’)->put(‘key’, ‘value’, 3600); // Store in cache
  • Cache::store(‘redis’)->get(‘key’); // Retrieve from cache
  • Session Storage: Update SESSION_DRIVER in.env to redis.
  • Queues: Set QUEUE_CONNECTION to redis in.env.
  • Broadcasting: Configure Redis as a broadcasting driver to implement real-time notifications.

Best Practices with Redis

  1. Monitor Usage: Use redis-cli or tools like RedisInsight.
  2. Set Expiration: Employ EXPIRE or TTL to stop uncontrolled growth.
  3. Utilize Namespaces: Use the keys with prefix to better arrange.
  4. Use Redis Cluster: Scale up to handle large-sized applications.

Secure Redis:

  • Make use of secure passwords
  • Redis bind only on specific IP.
  • Activate TLS.
  • Back up the server: Snapshotting or AOF should be turned on.
  • Minimize abuse: Redis can only be utilized when data stored needs in-memory speeds.
  • Code Efficiency: Implement Lua script codes for extensive computations.
  • Optimized Eviction: Select an appropriate eviction policy for eviction such as volatile-lru, allkeys-lru etc.
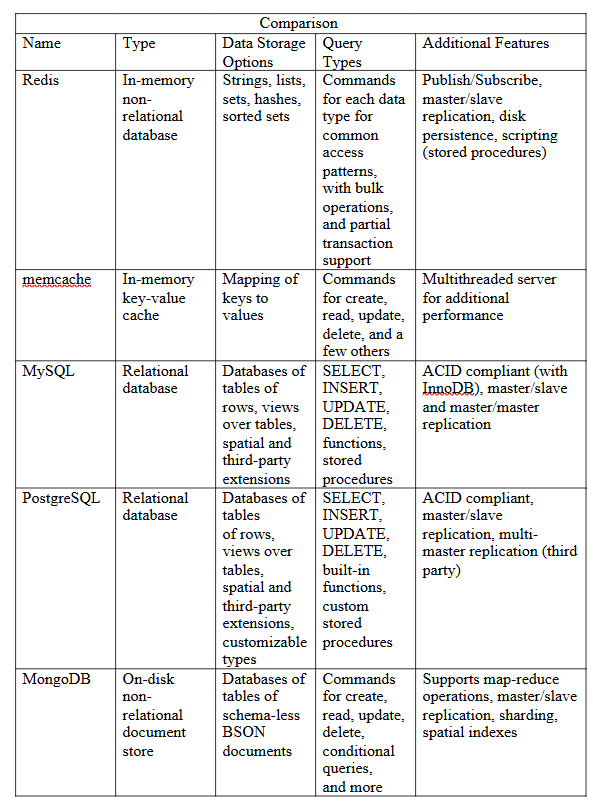
Tools and Libraries

  1. RedisInsight- GUI management for Redis
  2. Predis: a PHP extension allowing interaction with Redis
  3. Redis Modules:
    a) RedisJSON : Json support
    b) RediSearch : Full text Search
    c) RedisTimeSeries: manage time-series data
    d) RedisBloom : Probabilistic Data Structures
    e) Redis Sentinel- provide high availability for Redis applications automatically
    f) RedisGraph: Redis’ graph database.

Connect with Redis client API libraries:

Use the Redis client libraries to connect to Redis servers from your own code. Following client libraries for six main languages:

LanguageClient nameDocs
Pythonredis-pyredis-py guide
PythonRedisVLRedisVL guide
C#/.NETNRedisStackNRedisStack guide
JavaScriptnode-redisnode-redis guide
JavaJedisJedis guide
JavaLettuceLettuce guide
Gogo-redisgo-redis guide
PHPPredisPredis guide

Community-supported clients 

The table below shows the recommended third-party client libraries for languages that Redis does not document directly:

LanguageClient nameGithubDocs
Chiredishttps://github.com/redis/hiredishttps://github.com/redis/hiredis
C++Boost.Redishttps://github.com/boostorg/redishttps://www.boost.org/doc/libs/develop/libs/redis/doc/html/index.html
Dartredis_dart_linkhttps://github.com/toolsetlink/redis_dart_linkhttps://github.com/toolsetlink/redis_dart_link
PHPPhpRedis extensionhttps://github.com/phpredis/phpredishttps://github.com/phpredis/phpredis/blob/develop/README.md
Rubyredis-rbhttps://github.com/redis/redis-rbhttps://rubydoc.info/gems/redis
Rustredis-rshttps://github.com/redis-rs/redis-rshttps://docs.rs/redis/latest/redis/

redis-py guide (Python)

Connect your Python application to a Redis database

redis-py is the Python client for Redis. The sections below explain how to install redis-py and connect your application to a Redis database.

redis-py requires a running Redis or Redis Stack server. See Getting started for Redis installation instructions. You can also access Redis with an object-mapping client interface.

Install

To install redis-py, enter:

pip install redis

For faster performance, install Redis with hiredis support. This provides a compiled response parser, and for most cases requires zero code changes. By default, if hiredis >= 1.0 is available, redis-py attempts to use it for response parsing.

pip install redis[hiredis]

Connect and test

Connect to localhost on port 6379, set a value in Redis, and retrieve it. All responses are returned as bytes in Python. To receive decoded strings, set decode_responses=True. For more connection options, see these examples.

r = redis.Redis(host='localhost', port=6379, decode_responses=True)

Store and retrieve a simple string.

r.set('foo', 'bar')
# True
r.get('foo')

# bar

Store and retrieve a dict.

r.hset('user-session:123', mapping={
    'name': 'John',
    "surname": 'Smith',
    "company": 'Redis',
    "age": 29
})
# True

r.hgetall('user-session:123')
# {'surname': 'Smith', 'name': 'John', 'company': 'Redis', 'age': '29'}

Redis is a powerful and versatile tool for all kinds of use cases, from caching to real-time analytics. With its increasing feature set and community support, Redis remains a critical component of modern application architecture. Its flexibility and performance make it an essential technology for developers who want to build scalable, high-performance applications.

References:
https://dev.to/woovi/simple-cache-with-redis-5g3a
https://laravel.com/docs/11.x/redis
https://redis.io/docs/latest/develop/clients/
https://redis.io/ebook/part-1-getting-started/chapter-1-getting-to-kn…

Categories
Technology

WebRTC Demystified: Concepts, Applications, and Implementation

WebRTC Demystified: Concepts, Applications, and Implementation

In today’s digital age, real-time communication has become an integral part of our online experience. Whether you’re on a video call with colleagues, streaming live content, or playing multiplayer games, there’s a good chance you’re using WebRTC technology. Let’s dive deep into what WebRTC is, how it works, and how you can implement it in your applications.

What is WebRTC?

Web Real-Time Communication (WebRTC) is a revolutionary open-source technology that enables direct peer-to-peer communication between web browsers without requiring plugins or third-party software. It’s the technology powering many popular video communication platforms like Google Meet and countless other applications that require real-time audio, video, or data sharing. It ported by all major browsers like Chrome, Firefox, Safari, and Edge, WebRTC provides APIs for audio, video, and data sharing.

Core Features of WebRTC

Peer-to-Peer Communication: Directly connects users, bypassing the need for central servers for media streaming.

Cross-Platform Support: Works seamlessly across web browsers, mobile apps, and embedded systems.

Secure Communication: Uses DTLS (Datagram Transport Layer Security) and SRTP (Secure Real-time Transport Protocol) for encrypted data transmission.

Low Latency: Designed for real-time communication, ensuring minimal delay.

Core Components of WebRTC

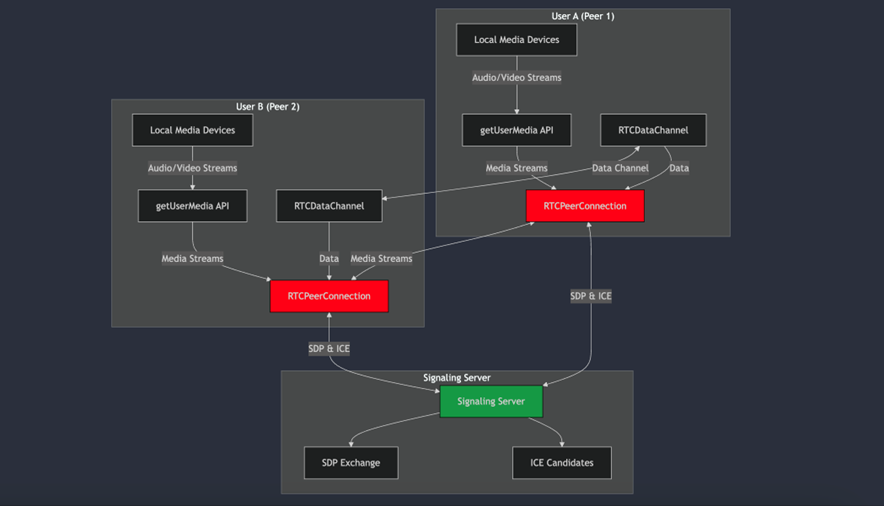
  1. RTCPeerConnection: The RTCPeerConnection is the foundation of WebRTC communication. Think of it as a virtual phone line between two peers, handling all aspects of the connection:
  2. Media stream transmission Connection establishment and maintenance Automatic bandwidth adjustments Signal processing and noise reduction
  3. RTCDataChannel: While many associate WebRTC with audio/video calls, it also provides a powerful data channel for sending arbitrary information between peers. This enables:
  4. Text chat functionality File sharing Game state synchronization Real-time collaborative features
  5. GetUserMedia API: Accesses the user’s camera and microphone.


Applications of WebRTC

WebRTC’s versatility makes it suitable for various use cases, including:

1. Video and Voice Calling
The most common application of WebRTC is video and audio calling. Platforms like Google Meet, Microsoft Teams, and Zoom leverage WebRTC to provide high-quality communication experiences.

2. Online Gaming
Real-time gaming requires low-latency data transfer, making WebRTC’s RTCDataChannel a perfect fit for multiplayer games and live gaming sessions.

3. Live Streaming
WebRTC is used for low-latency live streaming in apps like Periscope and some social media platforms.

4. Remote Collaboration Tools
From screen sharing to collaborative document editing, WebRTC facilitates real-time interactions for remote work and learning.

5. IoT Applications
WebRTC enables real-time communication between IoT devices for tasks such as remote monitoring and control.

How WebRTC Works
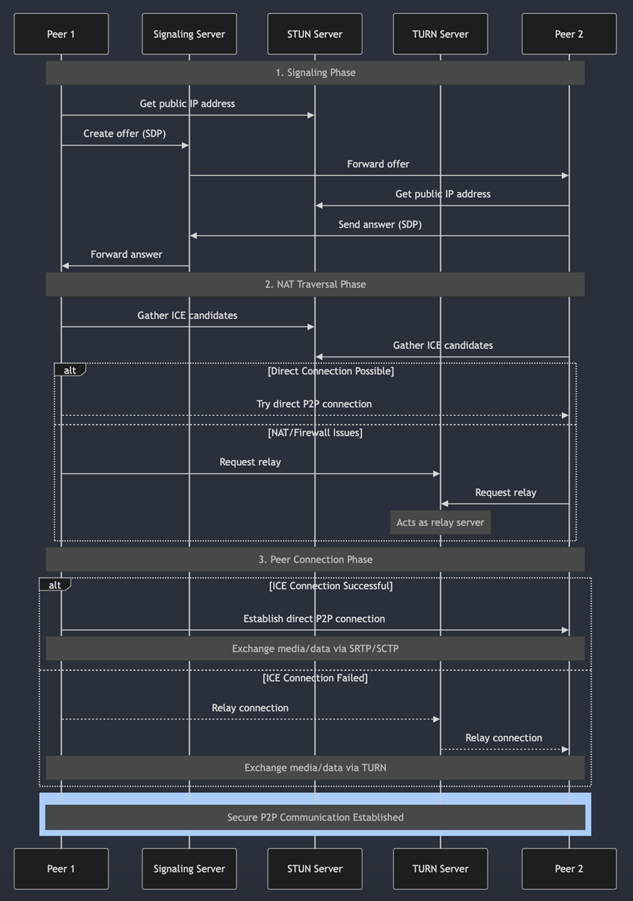
At its core, WebRTC establishes peer-to-peer connections through three main steps:

1. Signaling

Signaling is the process of exchanging connection metadata (like IP addresses) between peers. This is often done using a server over protocols like WebSockets. The signaling server is only required for the initial connection setup.

Before two peers can communicate, they need to exchange some initial information. This happens through a process called signaling:

  • The initiating peer creates an “offer”
  • The receiving peer responds with an “answer”
  • Both peers exchange network information (ICE candidates)

This exchange happens through a signaling server, which acts as an intermediary but doesn’t handle the actual media streams.

2. NAT Traversal with STUN and TURN

Using the Session Description Protocol (SDP), peers exchange information about supported codecs, resolution, and other media parameters.

  • One of the biggest challenges in peer-to-peer communication is establishing connections through firewalls and NATs. WebRTC handles this using: STUN (Session Traversal Utilities for NAT)
  • NAT Traversal with STUN and TURN Helps peers discover their public IP addresses Essential for establishing direct connections Relatively lightweight and inexpensive to operate
    • TURN (Traversal Using Relays around NAT) Acts as a fallback when direct connections aren’t possible Relays traffic between peers More resource-intensive but ensures connectivity

3. Peer-to-Peer Connection
Once signaling is complete, WebRTC uses ICE (Interactive Connectivity Establishment) to discover the best network path for data transfer. Media and data are then exchanged directly between peers using SRTP and SCTP (Stream Control Transmission Protocol).

Collects all potential connection paths (ICE candidates) Tests each path to find the optimal route Manages the connection process from start to finish

Implementing WebRTC:
A Basic Example Here’s a simplified example of implementing a WebRTC connection:

// Create peer connection

const peerConnection = new RTCPeerConnection();

peerConnection.onicecandidate = event => {

    if (event.candidate) {

        // Send candidate to remote peer via signaling server

        signalingChannel.send(JSON.stringify({

            type: 'candidate',

            candidate: event.candidate

        }));

    }

};

// Create and send offer

async function makeCall() {

    const offer = await peerConnection.createOffer();

    await peerConnection.setLocalDescription(offer);

    signalingChannel.send(JSON.stringify({

        type: 'offer',

        offer: offer

    }));

}

// Handle incoming media streams

peerConnection.ontrack = event => {

    const remoteStream = event.streams[0];

    // Display the remote stream in your UI

    remoteVideo.srcObject = remoteStream;

};

Best Practices for WebRTC Implementation

1. Connection Reliability

  • Always implement TURN server fallback
  • Handle network changes gracefully
  • Monitor connection quality

2. Security Considerations

  • Use secure signaling channels (WSS)
  • Implement proper user authentication
  • Encrypt data channels when handling sensitive information

3. Performance Optimization

  • Implement adaptive bitrate streaming
  • Use appropriate video codecs
  • Monitor and optimize bandwidth usage


    Challenges and Considerations

    While WebRTC is powerful, it comes with its own set of challenges:
  1. Scalability

    P2P connections become resource-intensive with multiple users May require media servers for large-scale applications

2. Browser Compatibility

  • Different browsers may implement features differently
  • Need for fallback solutions

3. Network Conditions

  • Variable connection quality
  • Bandwidth limitations
  • Firewall restrictions

The Future of WebRTC

WebRTC continues to evolve with new features and improvements:

  • Better codec support
  • Enhanced performance
  • Improved mobile support
  • Integration with emerging technologies

Conclusion

WebRTC has transformed the landscape of real-time communication on the web. Its open-source nature, robust features, and growing support make it an excellent choice for building real-time applications. Whether you’re developing a video chat application, a collaborative tool, or a gaming platform, understanding WebRTC’s concepts and implementation details is crucial for creating successful real-time applications. By following best practices and staying updated with the latest developments, you can leverage WebRTC to create powerful, real-time experiences for your users. The technology continues to evolve, and its future looks promising as more applications adopt peer-to-peer communication capabilities.

References:

Categories
Technology

Internationalization and Localization in React Native

Internationalization and Localization in React Native

In today’s global marketplace, creating apps that can reach users worldwide isn’t just a luxury—it’s a necessity. Internationalization (i18n) and Localization (l10n) are crucial steps in making your React Native app accessible to users across different languages and regions. This guide will walk you through implementing these features effectively in your React Native applications.

Understanding i18n and l10n

What is Internationalization (i18n)?

Internationalization is the process of designing and preparing your app to be adapted to different languages and regions. This involves:

  • Extracting text content from your code
  • Handling different date formats
  • Managing number formatting
  • Supporting right-to-left (RTL) languages
  • Adapting to various cultural preferences

What is Localization (l10n)?

Localization is the actual process of adapting your app for a specific locale or region, including:

  • Translating text content
  • Adjusting images and colors for cultural appropriateness
  • Modifying content to match local preferences
  • Ensuring proper currency and measurement unit display

Why it Matters

In today’s globalized world, mobile applications are used by a diverse audience across different countries and cultures. Internationalization and localization ensure that apps provide a seamless and personalized user experience, regardless of the user’s language or region. Here are the key reasons why it is essential:

  • Reaching a Global Audience: With mobile apps being used worldwide, supporting multiple languages ensures you can cater to a broader user base, breaking down language barriers.
  • Enhanced User Experience: Providing a localized experience makes users feel more connected, leading to improved engagement and satisfaction.
  • Market Penetration: Localization helps businesses enter new markets more effectively, increasing adoption rates and customer loyalty.
  • Competitive Advantage: Apps with multi-language support are more likely to stand out in a crowded market.
  • Cultural Sensitivity: Adapting content to align with local customs and preferences demonstrates respect for cultural differences, fostering trust with users.

Setting Up i18n in React Native

1. Installing Required Dependencies

To implement internationalization in React Native, you’ll need to install the following packages:

Command : npm install react-native-localize i18next react-i18next

 2. Configure i18n

3. Configure component that utilizes both i18n and localization

Native-Side Implementation Requirements

Why Native Implementation is Critical

While React Native handles most of our UI localization through JavaScript, there are several scenarios where native-side implementation becomes essential:

System-Generated Messages

  • Native error messages
  • Permission dialogs
  • System alerts
  • File picker dialogs
  • Default date/time pickers

These messages come directly from the native iOS/Android systems and need proper localization configuration to display in the user’s language.

iOS Native Setup

1. Add supported languages to your Info.plist

2. Create Localization Files

  • In Xcode, select your project
  • Click “+” under “Localizations” in project info
  • Select languages you want to support
  • Create .strings files:

3. Create Localization Manager (Optional)

Android Native Setup

1. Create String Resources

2. Update Android Manifest

Add supported locales in android/app/src/main/AndroidManifest.xml

3. Create Language Helper (Optional)

Code for Creating language helper:

// LanguageHelper.kt package com.yourapp

import android.content.Context import android.os.Build import java.util.*

class LanguageHelper { companion object { fun setLocale(context: Context, languageCode: String) { val locale = Locale(languageCode) Locale.setDefault(locale)

       val resources = context.resources
        val configuration = resources.configuration
       
        configuration.setLocale(locale)
        context.createConfigurationContext(configuration)
    }

    fun getCurrentLanguage(context: Context): String {
        return if (Build.VERSION.SDK_INT >= Build.VERSION_CODES.N) {
            context.resources.configuration.locales[0].language
        } else {
            context.resources.configuration.locale.language
        }
    }

    fun getAvailableLanguages(context: Context): List<String> {
        return context.assets.locales.toList()
    }
}
  }

Conclusion

Implementing internationalization and localization in your React Native app requires careful planning and attention to detail. By following these best practices and guidelines, you can create a truly global app that provides an excellent user experience across different languages and regions.

References:
i18n docs
i18n React Native package

Categories
Technology

Secure Web URL Algorithms

Secure Web URL Algorithms

Secure URL algorithms ensure that URLs used for sensitive information, authentication, or secure access are both encrypted and verified. These algorithms protect against unauthorized data access by encoding information in URLs and providing a means to verify its authenticity.

HMAC-SHA (Hash-Based Message Authentication Code with SHA)

Description:

 HMAC-SHA is a cryptographic mechanism that combines a secure hash function (such as SHA-1, SHA-256, or SHA-512) with a secret key to generate a unique message digest, often referred to as a signature. This signature ensures the authenticity and integrity of data transmitted via URLs. When used in URLs, the HMAC acts as a digital seal, guaranteeing that the URL has not been altered or tampered with during transmission.
HMAC-SHA does not encrypt the URL content but validates its authenticity, making it especially valuable for APIs, temporary access links, and other secure communication scenarios.

How It Works

Generate the HMAC:

  • The server takes the original URL (or specific parameters within it) and a pre-shared secret key.
  • Using a cryptographic hash function (like SHA-256), it generates an HMAC based on this combination.
  • Append HMAC to URL:
  •  
  • The resulting HMAC is appended to the URL as a query parameter (e.g., ?signature=<HMAC>).

Transmit the URL:

  • The URL, along with the appended HMAC, is sent to the client or used as a secure link. 
  • Verification:  
  • When the client sends the URL back to the server or uses the link, the server extracts the HMAC. 
  • It recalculates the HMAC using the received URL and the secret key. 
  • If the newly calculated HMAC matches the one appended to the URL, the URL is verified as authentic and unaltered. 

Pros:

High Security: 

  • Ensures both integrity and authenticity of the URL, preventing unauthorized tampering. 

Fast and Efficient: 

  • HMAC generation and verification are computationally efficient, even for large-scale applications. 

Widely Supported: 

  • Compatible with most programming languages and frameworks, making it easy to implement. 

Tamper Prevention: 

  •  Protects URLs from malicious alterations by unauthorized parties. 

Deterministic: 

  • The same input will always generate the same HMAC, ensuring consistency in verification. 

Cons:

  • Relies on securely storing and sharing the secret key.
  • Does not encrypt URL content (only validates it).

Use Case:

Commonly used in APIs and signed URLs for file-sharing services like AWS S3 or Google Cloud.


2. AES (Advanced Encryption Standard)

Description

AES (Advanced Encryption Standard) is a widely used symmetric encryption algorithm designed to securely encrypt and decrypt data. It ensures the confidentiality of sensitive information embedded in URLs, making it highly effective in safeguarding access tokens, user IDs, session identifiers, and other critical data transmitted over the web. Since it uses the same secret key for encryption and decryption, AES requires secure key exchange and management to prevent unauthorized access.

AES is recognized for its high performance, adaptability, and robustness. It supports key sizes of 128, 192, and 256 bits, allowing for flexible implementation based on the required security level.

How It Works

Encryption Process:

  •  Sensitive URL parameters, such as tokens or user identifiers, are encrypted on the server using AES and a pre-defined secret key.
  • The encrypted data is converted into a Base64 or URL-safe string and appended to the URL, ensuring it remains compatible with HTTP transmission.

Decryption Process:

  •  When the URL is received by the server or a designated endpoint, the encrypted parameters are extracted.
  • Using the same secret key, the encrypted data is decrypted, revealing the original information.

Transmission Security:

 Along with HTTPS for secure communication, AES encryption adds an additional layer of protection to ensure that sensitive URL data remains confidential, even if intercepted.

Pros:

  • Strong encryption ensures data confidentiality.
  • Efficient and widely supported.
  • Prevents unauthorized access to sensitive URL data.

Cons:

  • Key exchange and management can be challenging.
  • Requires additional processing power for encryption and decryption.

Use Case:

Encrypting sensitive data in URLs, such as access tokens, user IDs, or session identifiers.

3. RSA (Rivest-Shamir-Adleman)

Description

RSA is a widely used asymmetric encryption algorithm designed for secure data transmission. It relies on a pair of cryptographic keys: a public key for encryption and a private key for decryption. Unlike symmetric encryption, RSA does not require both parties to share a single secret key, making it ideal for secure communications over public networks.

When used for securing URLs, RSA ensures that sensitive data can only be decrypted by the intended recipient, providing robust protection against unauthorized access.

How It Works

Key Generation:

  • A pair of cryptographic keys (a public key and a private key) is generated.
  • The public key is shared with the sender, while the private key remains securely with the recipient.

Encrypting URL Content:

  • The server encrypts sensitive URL data using the recipient’s public key.
  • The encrypted data is appended to the URL as a query parameter.

Transmitting the URL:

 The encrypted URL is sent to the recipient over public or private channels.

Decrypting the URL:

  • The recipient retrieves the encrypted data from the URL.
  • Using their private key, the recipient decrypts the data to access the original content.

Pros:

Strong Encryption: 

  • RSA offers robust security, as only the private key can decrypt data encrypted with the corresponding public key. 

No Shared Secret Key: 

  • There is no need to exchange or share a single key between parties, reducing the risk of key compromise. 

Secure for Public Channels: 

  • Data encrypted with the public key can safely traverse insecure channels, as only the recipient can decrypt it. 

Versatility: 

  •  RSA can be used for both encryption and digital signatures, providing authenticity and integrity in addition to confidentiality. 

Non-Repudiation: 

  • RSA’s use in digital signatures ensures that senders cannot deny having sent a message or URL. 

Cons:

Slower Than Symmetric Algorithms:

·      RSA is computationally intensive and slower compared to symmetric encryption algorithms like AES, especially for large amounts of data.

Use Case:

Sharing sensitive URLs in secure communications, such as email invitations or encrypted download links.

4. Base64 Encoding

Description

Base64 encoding is a technique used to encode binary data into a text format, making it suitable for transmission in URLs. Although not an encryption method, Base64 ensures URL-safe encoding by replacing non-printable characters with alphanumeric symbols. It is typically used for obfuscation rather than encryption.

How It Works

Encoding Data:

Sensitive URL parameters are encoded using Base64 to convert them into a URL-safe string.

Appending to URL:

The encoded string is appended as a query parameter.

Decoding:

The receiver decodes the string back to its original form.

Pros

  • Simple and efficient.
  • Compatible with all web frameworks.
  • Avoids URL encoding issues.

Cons

  • Not secure on its own as it does not encrypt or validate data.
  • Vulnerable to decoding by anyone with basic tools.

Use Case

Obfuscating non-sensitive data in URLs for improved readability.

5. URL Tokenization

Description

Tokenization replaces sensitive information in URLs with unique, non-identifiable tokens. These tokens map to the original data stored securely on the server, reducing the risk of exposing sensitive details.

How It Works

Generate Token:

  • The server generates a random token for the sensitive data. 

Store Mapping: 

  • The token and its corresponding data are stored securely in a database. 

Append to URL: 

  • The token replaces the sensitive data in the URL. 

Token Validation: 

  • On URL access, the server retrieves the original data using the token. 

Pros

  • Ensures sensitive data is never exposed.
  • Easy to revoke tokens if needed.
  • Ideal for one-time or temporary URLs.

Cons

  • Requires server-side storage for token mapping.
  • Adds complexity to URL management.

Use Case

Temporary access URLs for password resets or file downloads.

6. SHA-3 Hashing

Description

SHA-3 is a secure cryptographic hashing algorithm that generates fixed-length digests. When used with URLs, it ensures data integrity by creating a hash that can detect any tampering.

How It Works

Generate Hash:

  • Compute a SHA-3 hash of the URL or specific parameters.

Append to URL:

  • Add the hash as a query parameter.

Verify Integrity:

  • Recalculate the hash on the server and compare it with the received hash.

Pros

  •  Strong protection against tampering.
  • Efficient and resistant to collision attacks.

Cons

  •  Does not encrypt data.
  • Relies on HTTPS for confidentiality.

Use Case

Ensuring the integrity of signed URLs in APIs.

Conclusion

In an era where data privacy and security are paramount, securing web URLs has become an essential practice for protecting sensitive information and ensuring trusted communication over the web. Each algorithm discussed—HMAC-SHA, AES, RSA, and others—offers distinct strengths and is suited for different use cases.

  • HMAC-SHA ensures authenticity and integrity, making it ideal for validating URLs and preventing tampering.
  • AES provides robust encryption for securing sensitive data within URLs, ensuring confidentiality.
  • RSA offers powerful asymmetric encryption for secure communication, especially over public channels.
  • Additional algorithms, like Elliptic Curve Cryptography (ECC) and URL Tokenization, provide modern, efficient, and scalable solutions for specific use cases.

Selecting the right algorithm depends on the application’s requirements, including the need for encryption versus validation, computational efficiency, key management, and the type of data being transmitted. Combined with HTTPS and proper security practices, these algorithms form a strong foundation for protecting web URLs in today’s digital landscape.

References

  1. HMAC-SHA
    1. National Institute of Standards and Technology (NIST): HMAC Guidelines
    1. Wikipedia: HMAC Overview
  2. AES
    1. Federal Information Processing Standards (FIPS): AES Specification
    1. OpenSSL Documentation: AES Encryption
  3. RSA
    1. Rivest, Shamir, Adleman (1978): Original RSA Paper
    1. RSA Security: Understanding RSA
  4. Elliptic Curve Cryptography (ECC)
    1. Certicom Research: ECC Overview
    1. NIST: Elliptic Curve Digital Signature Algorithm (ECDSA)
  5. URL Tokenization
    1. Cloudflare Blog: Tokenized URLs
    1. AWS Documentation: Presigned URLs
  6. HTTPS and Secure Communication
    1. Mozilla Developer Network (MDN): HTTPS
    1. Let’s Encrypt: Securing Websites
  7. Quantum-Safe Encryption
    1. National Institute of Standards and Technology (NIST): Post-Quantum Cryptography
    1. IBM Research Blog: Quantum-Safe Cryptography

These resources provide comprehensive insights into each algorithm, guiding developers and security professionals in implementing secure web URL practices effectively.

Categories
Technology

LOAD BALANCERS

What is load balancing? 
Load balancing is the process of distributing traffic among multiple servers to improve a service or application’s performance and reliability.
Load balancing is the practice of distributing computational workloads between two or more computers. On the Internet, load balancing is often employed to divide network traffic among several servers. This reduces the strain on each server and makes the servers more efficient, speeding up performance and reducing latency. Load balancing is essential for most Internet applications to function properly.

Imagine a highway with 8 lanes, but only one lane is open for traffic due to construction. All vehicles must merge into that single lane, causing a massive traffic jam and long delays. Now, imagine the construction ends, and all 8 lanes are opened. Vehicles can spread out across the lanes, significantly reducing travel time for everyone.

Load balancing essentially accomplishes the same thing. By dividing user requests among multiple servers, user wait time is vastly cut down. This results in a better user experience — the grocery store customers in the example above would probably look for a more efficient grocery store if they always experienced long wait times.

How does load balancing work?

 Load balancing is handled by a tool or application called a load balancer. A load balancer can be either hardware-based or software-based. Hardware load balancers require the installation of a dedicated load balancing device; software-based load balancers can run on a server, on a virtual machine, or in the cloud. Content delivery networks (CDN) often include load balancing features.

  When a request arrives from a user, the load balancer assigns the request to a given server, and this process repeats for each request. Load balancers determine which server should handle each request based on a number of different algorithms. These algorithms fall into two main categories: static and dynamic.

Static load balancing algorithms

Static load balancing algorithms distribute workloads without taking into account the current state of the system. A static load balancer will not be aware of which servers are performing slowly, and which servers are not being used enough. Instead, it assigns workloads based on a predetermined plan. Static load balancing is quick to set up but can result in inefficiencies. Referring back to the analogy above, imagine if the grocery store with 8 open checkout lines has an employee whose job it is to direct customers into the lines. Imagine this employee simply goes in order, assigning the first customer to line 1, the second customer to line 2, and so on, without looking back to see how quickly the lines are moving. If the 8 cashiers all perform efficiently, this system will work fine — but if one or more is lagging, some lines may become far longer than others, resulting in bad customer experiences. Static load balancing presents the same risk: sometimes, individual servers can still become overburdened

1.Round robin DNS and client-side random load balancing are two common forms of static load     balancing.
  Round robin: Round robin load balancing distributes traffic to a list of servers in rotation using the Domain Name System (DNS). An authoritative nameserver will have a list of different A records for a domain and provides a different one in response to each DNS query.

2. Weighted round robin: Allows an administrator to assign different weights to each server. Servers deemed able to handle more traffic will receive slightly more. Weighting can be configured within DNS records.

3. IP hash: Combines incoming traffic’s source and destination IP addresses and uses a mathematical function to convert it into a hash. Based on the hash, the connection is assigned to a specific server.

Dynamic load balancing algorithms

 Dynamic load balancing algorithms take the current availability, workload, and health of each server into account. They can shift traffic from overburdened or poorly performing servers to underutilized servers, keeping the distribution even and efficient. However, dynamic load balancing is more difficult to configure. A number of different factors play into server availability: the health and overall capacity of each server, the size of the tasks being distributed, and so on.

Suppose the grocery store employee who sorts the customers into checkout lines uses a more dynamic approach: the employee watches the lines carefully, sees which are moving the fastest, observes how many groceries each customer is purchasing, and assigns the customers accordingly. This may ensure a more efficient experience for all customers, but it also puts a greater strain on the line-sorting employee.

There are several types of dynamic load balancing algorithms, including least connection, weighted least connection, resource-based, and geolocation-based load balancing.

  1. Least connection: Checks which servers have the fewest connections open at the time and sends traffic to those servers. This assumes all connections require roughly equal processing power.

2. Weighted least connection: Gives administrators the ability to assign different weights to each server, if some servers can handle more connections than others.

3. Weighted response time: Averages the response time of each server and combines that with the number of connections each server has open to determine where to send traffic. By sending traffic to the servers with the quickest response time, the algorithm ensures faster service for users.

4. Resource-based: Distributes load based on what resources each server has available at the time. Specialized software (called an “agent”) running on each server measures that server’s available CPU and memory, and the load balancer queries the agent before distributing traffic to that server.

Where is load balancing used?

As discussed above, load balancing is often used with web applications. Software-based and cloud-based load balancers help distribute Internet traffic evenly between servers that host the application. Some cloud load balancing products can balance Internet traffic loads across servers that are spread out around the world, a process known as global server load balancing (GSLB).

Load balancing is also commonly used within large, localized networks, like those within a data center or a large office complex. Traditionally, this has required the use of hardware appliances such as an application delivery controller (ADC) or a dedicated load balancing device. Software-based load balancers are also used for this purpose.

What is server monitoring?

Dynamic load balancers must be aware of server health: their current status, how well they are performing, etc. Dynamic load balancers monitor servers by performing regular server health checks. If a server or group of servers is performing slowly, the load balancer distributes less traffic to it. If a server or group of servers fails completely, the load balancer reroutes traffic to another group of servers, a process known as “failover.”

What is failover? Failover occurs when a given server is not functioning, and a load balancer distributes its normal processes to a secondary server or group of servers. Server failover is crucial for reliability: if there is no backup in place, a server crash could bring down a website or application. It is important that failovers take place quickly to avoid a gap in service.

Load Balancing Techniques:

  • Round Robin load balancing method

Round-robin load balancing is the simplest and most commonly-used load balancing algorithm. Client requests are distributed to application servers in simple rotation. For example, if you have three application servers: the first client request is sent to the first application server in the list, the second client request to the second application server, the third client request to the third application server, the fourth to the first application server, and so on.

Round robin load balancing is most appropriate for predictable client request streams that are being spread across a server farm whose members have relatively equal processing capabilities and available resources (such as network bandwidth and storage).

  • Weighted Round Robin load balancing method

Weighted round robin is similar to the round-robin load balancing algorithm, adding the ability to spread the incoming client requests across the server farm according to the relative capacity of each server. It is most appropriate for spreading incoming client requests across a set of servers that have varying capabilities or available resources. The administrator assigns a weight to each application server based on criteria of their choosing that indicates the relative traffic-handling capability of each server in the farm.

So, for example: if application server #1 is twice as powerful as application server #2 (and application server #3), application server #1 is provisioned with a higher weight and application server #2 and #3 get the same, lower, weight. If there are five (5) sequential client requests, the first two (2) go to application server #1, the third (3) goes to application server #2, the fourth (4) to application server #3. The fifth (5) request would then go to application server #1, and so on.

  • Least Connection load balancing method

Least connection load balancing is a dynamic load balancing algorithm where client requests are distributed to the application server with the least number of active connections at the time the client request is received. In cases where application servers have similar specifications, one server may be overloaded due to longer lived connections; this algorithm takes the active connection load into consideration. This technique is most appropriate for incoming requests that have varying connection times and a set of servers that are relatively similar in terms of processing power and available resources.

  • Weighted Least Connection load balancing method

Weighted least connection builds on the least connection load balancing algorithm to account for differing application server characteristics. The administrator assigns a weight to each application server based on the relative processing power and available resources of each server in the farm. The LoadMaster makes load balancing decisions based on active connections and the assigned server weights (e.g., if there are two servers with the lowest number of connections, the server with the highest weight is chosen).

  • Resource Based (Adaptive) load balancing method

Resource based (or adaptive) load balancing makes decisions based on status indicators retrieved by LoadMaster from the back-end servers. The status indicator is determined by a custom program (an “agent”) running on each server. LoadMaster queries each server regularly for this status information and then sets the dynamic weight of the real server appropriately.

In this fashion, the load balancing method is essentially performing a detailed “health check” on the real server. This method is appropriate in any situation where detailed health check information from each server is required to make load balancing decisions. For example: this method would be useful for any application where the workload is varied and detailed application performance and status is required to assess server health. This method can also be used to provide application-aware health checking for Layer 4 (UDP) services via the load balancing method.

  • Resource Based (SDN Adaptive) load balancing method

SDN (Software Defined Network) adaptive is a load balancing algorithm that combines knowledge from Layers 2, 3, 4 and 7 and input from an SDN (Software Defined Network) controller to make more optimized traffic distribution decisions. This allows information about the status of the servers, the status of the applications running on them, the health of the network infrastructure, and the level of congestion on the network to all play a part in the load balancing decision making. This method is appropriate for deployments that include an SDN (Software Defined Network) controller.

  • Fixed Weighting load balancing method
    Fixed weighting is a load balancing algorithm where the administrator assigns a weight to each application server based on criteria of their choosing to represent the relative traffic-handling capability of each server in the server farm. The application server with the highest weight will receive all of the traffic. If the application server with the highest weight fails, all traffic will be directed to the next highest weight application server. This method is appropriate for workloads where a single server is capable of handling all expected incoming requests, with one or more “hot spare” servers available to pick up the load should the currently active server fail.
  • Weighted Response Time load balancing method

The weighted response time load balancing algorithm that uses the application server’s response time to calculate a server weight. The application server that is responding the fastest receives the next request. This algorithm is appropriate for scenarios where the application response time is the paramount concern.

  • Source IP Hash load balancing method

The source IP hash load balancing algorithm uses the source and destination IP addresses of the client request to generate a unique hash key which is used to allocate the client to a particular server. As the key can be regenerated if the session is broken, the client request is directed to the same server it was using previously. This method is most appropriate when it’s vital that a client always return to the same server for each successive connection.

  • URL Hash load balancing method

The URL hash load balancing algorithm is similar to source IP hashing, except that the hash created is based on the URL in the client request. This ensures that client requests to a particular URL are always sent to the same back-end server.

REFERENCES: –

1. https://youtu.be/sCR3SAVdyCc?si=cBcMmD4jrq_m28Lz

 2. https://youtu.be/dBmxNsS3BGE?si=XfTCni1Wc2tGguy9

Conclusion: –

Load balancing is a critical component of modern web infrastructure that ensures optimal performance, reliability, and scalability of applications and services. Through various algorithms and techniques, load balancers effectively distribute incoming traffic across multiple servers, preventing any single server from becoming overwhelmed while maintaining consistent service delivery.

Categories
Technology

React Native 0.76: Essential Updates and Improvements You Should Know

React Native 0.76: Essential Updates and Improvements You Should Know

React Native version 0.76, released on October 23, 2024, marks a significant milestone in mobile app development. The update’s standout feature is the complete removal of the bridge in the New Architecture, resulting in improved app startup times and more efficient communication between JavaScript and native code. React 18 is now enabled by default, introducing concurrent rendering and automatic batching capabilities. The release also brings practical enhancements like built-in shadow styling for Android and native blur effects support. These improvements collectively aim to streamline the development process and boost app performance, making React Native development more efficient than ever before.

Gradual Migration: A Simplified Upgrade Path

The good news is that most apps can upgrade to 0.76 with the usual effort required for React Native releases. The New Architecture and React 18 are now enabled by default, offering more flexibility to developers while also introducing concurrent features. However, to fully embrace the benefits, a gradual migration is recommended.

To migrate your JavaScript code to React 18 and its semantics, follow the React 18 Upgrade guide.
React Native 0.76’s automatic interoperability layer allows code to run on both the New and old Architecture. While this works for most cases, accessing custom Shadow Nodes and concurrent features requires module upgrades. Developers can upgrade components gradually, with the interoperability layer ensuring smooth transitions until full migration is complete.

The React Native team has collaborated with over 850 library maintainers to ensure compatibility with the New Architecture, making it easier to find updated libraries on the React Native Directory.

Major Milestones in React Native 0.76

The release of React Native 0.76 marks a significant milestone for the framework, bringing the New Architecture to the forefront by default and introducing the highly anticipated React Native DevTools. This achievement is the result of six years of dedicated effort from our team and the unwavering support of our vibrant community of developers.

Key Highlights

1. New Architecture Now Default

  • Enabled by default in all projects
  • Production-ready
  • Improves native app development quality

    2. New DevTools Released
  • Built on Chrome DevTools
  • Features:
    • Standard debugging tools (breakpoints, watch values)
    • Better React DevTools integration
    • Clear debugger overlay
    • Reliable reconnection
    • Zero-config launch

      3. Performance Improvements
  • Metro resolver is 15x faster
  • Especially noticeable in warm builds

    4. New Styling Options
  • Added boxShadow and filter props
  • Only available with New Architecture

    Breaking Changes
  • Removed Dependency on @react-native-community/cli: To accelerate the evolution of React Native, we have removed this dependency, allowing independent project releases and clearer responsibilities. Developers using the CLI should explicitly add it to their package.json.
  • Reduced Android App Size: Native Library merging has led to a reduction of approximately 3.8 MB in app size (about 20% of the total) and improved startup performance on Android.

    Updated Minimum SDK Requirements:

  • iOS: Updated from 13.4 to 15.1
  • Android: Updated from SDK 23 to SDK 24 (Android 7)
  • Other Notable Changes
  • Animation Performance Enhancements: State updates in looping animations are now stopped to prevent unnecessary re-renders.
  • Text Engine Updates: The text rendering engine now consistently uses AttributedStringBox.
  • Rendering Changes on Android: View backgrounds are no longer directly associated with ReactViewBackgroundDrawable or CSSBackgroundDrawable.

    Exciting New Features in React Native 0.76
  1. Android Box Shadows and Built-in Blur Effects
  2. React Native 0.76 introduces native support for box shadows on Android, which makes styling significantly easier. Developers can now apply box shadows with CSS-like ease instead of using the elevation property, which often fell short of expectations. Additionally, built-in blur effects eliminate the need for external libraries like react-native-blur. These changes have received overwhelmingly positive responses from developers, who have long awaited these styling improvements.
  3. Automatic Batching with React 18

    Automatic batching in React 18 allows React Native to batch state updates more efficiently, reducing lag and improving the overall speed of applications. This upgrade reduces the rendering of intermediate states, ensuring that the UI quickly reaches the desired state. In the New Architecture, React Native automatically batches frequent state updates, which can make apps more responsive without requiring additional code.
  4. Support for Concurrent Rendering with Transitions

    React 18 introduces the concept of transitions, distinguishing between urgent and non-urgent updates. Urgent updates respond to direct user interactions, like typing or button presses, while transition updates enable smoother UI changes that can be deferred to the background. For example, when a user moves a slider, urgent updates can show the slider’s position immediately, while transition updates gradually adjust elements like a tiled view or a detailed background image.

    The new startTransition API lets developers specify which updates are urgent and which can run in the background:

This enables more responsive UIs and smoother experiences without sacrificing performance.

5. useLayoutEffect for Synchronous Layout Information

React Native 0.76 now includes proper support for useLayoutEffect, allowing synchronous access to layout information. Previously, developers had to rely on asynchronous callbacks in onLayout, which caused layout delays. With useLayoutEffect, layout measurements are read synchronously, so positioning elements like tooltips becomes more intuitive and accurate.

The New Architecture fixes this by allowing synchronous access to layout information in useLayoutEffect:

6. Full Support for Suspense
With React Native 0.76, developers can use Suspense for concurrent loading states. Suspense allows parts of the component tree to wait for data to load while maintaining responsiveness for visible content. This enables better handling of loading states and a smoother experience, especially for complex UIs with multiple loading components.

7. Removing the Bridge: Faster, More Reliable Communication
In React Native 0.76’s New Architecture, the longstanding JavaScript-to-native bridge is replaced with the JavaScript Interface (JSI), allowing direct, efficient communication between JavaScript and native code. This shift improves startup performance and paves the way for enhanced stability and error reporting.

The bridge has been a core component of React Native, acting as a communication layer between JavaScript and native modules. However, it came with certain limitations, such as slower initialization times and occasional instability. By replacing the bridge with direct C++ bindings through JSI, React Native 0.76 provides a more streamlined experience.

Improved Startup Time

In the old architecture, initializing global methods required loading JavaScript modules on startup, which could cause delays. For instance:

 In the New Architecture, these methods can be bound directly from C++, eliminating the need for bridge-based setup. This approach improves startup speed, reduces overhead, and simplifies initialization:

Enhanced Error Reporting and Debugging

Removing the bridge also leads to better error handling and debugging. Crashes occurring at startup are now easier to diagnose, and React Native DevTools has been updated to support the New Architecture, making it more accessible to debug complex issues. This is particularly valuable in identifying crashes stemming from undefined behavior, ensuring that errors are accurately reported with more actionable insights.

Why Upgrade? Key Benefits of Moving to React Native 0.76

Upgrading to React Native 0.76 offers several clear benefits, making it worthwhile for developers looking to build faster, more responsive apps:

  1. Better Performance
  2. React Native’s New Architecture, combined with React 18, significantly improves performance by introducing concurrent rendering and automatic batching. These changes reduce bottlenecks in UI rendering, especially for complex apps with heavy animations and user interactions.
  3. Enhanced Developer Experience
    New styling options, such as native box shadows and blur effects, bring React Native styling closer to CSS, making it easier to create visually appealing interfaces without relying on third-party libraries. The useLayoutEffect hook, synchronous layout information, and full support for Suspense provide developers with more tools to handle complex layouts and loading states.
  4. Smooth Transition Path
    The New Architecture offers a gradual migration path, allowing developers to upgrade at their own pace without sacrificing stability. The interoperability layer enables apps to run on both the old and new architectures, letting developers incrementally adopt concurrent features.
  5. Future-Proofing Your App
    React Native 0.76 is designed to support long-term growth, with widespread library compatibility and a robust community ensuring that apps built on this version remain relevant. By upgrading, developers position their apps to take full advantage of upcoming advancements in the React Native ecosystem.

    How to Upgrade

    To upgrade to React Native 0.76, follow the instructions in the official release post. If you’re also migrating to React 18, refer to the React 18 Upgrade guide to ensure your JavaScript code aligns with concurrent feature requirements. Here are the general steps:
  1. Update Libraries and Modules: Make sure your libraries are compatible with the New Architecture. You can check the React Native Directory for the latest compatibility information.
  2. Prepare for Migration: For custom native modules and components, migrate to the New Architecture to unlock features like synchronous calls, shared C++, and type safety from codegen.
  3. Opt-Out Option: If the New Architecture is causing issues, you can opt out by disabling newArchEnabled in your Android gradle.properties file or running RCT_NEW_ARCH_ENABLED=0 bundle exec pod install on iOS.

    This update is a significant leap for React Native, bringing it closer to a seamless cross-platform experience. The React Native team and community have collaborated to make the New Architecture widely supported, with more improvements on the horizon. As the ecosystem adapts to these changes, React Native continues to solidify its position as a versatile tool for mobile development.

    React Native 0.76 is a compelling step forward in mobile app development. With enhanced styling, support for React 18, and a robust New Architecture, it gives developers powerful tools for building more efficient, responsive, and engaging applications. Whether you’re upgrading an existing app or starting fresh, React Native 0.76 is packed with features designed to improve the development experience.

    References:
  1. React Native’s New Architecture Blog Post
    React Native Team. “The New Architecture is Here.” React Native Blog, 23 Oct. 2024.
    https://reactnative.dev/blog/2024/10/23/the-new-architecture-is-here
  2. React 18 Upgrade Guide
    React Team. “React 18 Upgrade Guide.”
    https://react.dev/blog/2022/03/08/react-18-upgrade-guide
  3. React Native Directory
    Community Resources. “React Native Directory.” React Native Directory.
    https://reactnative.directory/
Categories
Technology

SpaDeX: ISRO’s Next Leap in Space Exploration

SpaDeX: ISRO’s Next Leap in Space Exploration

The Indian Space Research Organisation (ISRO), is preparing to achieve another landmark with its Space Docking Experiment (SpaDeX), set to launch on December 30, 2024. This mission aims to demonstrate India’s capability to perform docking operations in space where two spacecraft meet, connect, and later separate while orbiting Earth.

The mission is significant not only for its technical complexity but also for its implications for India’s future in space exploration. With SpaDeX, India could join an elite group of countries like the United States, Russia, and China that have mastered the space docking.

Team Effort and Preparations

The development of SpaDeX has been a collaborative effort, led by ISRO’s UR Rao Satellite Centre (URSC) and supported by other ISRO centres. After rigorous testing and integration at Ananth Technologies in Bangalore, the spacecraft have been transported to the Satish Dhawan Space Centre (SDSC) for final preparations. Once in orbit, ISRO’s ISTRAC will operate the spacecraft using ground stations.

Mission Objectives

SpaDeX has several key goals:

  1. Proving Rendezvous and Docking Feasibility: Demonstrating that two spacecraft can rendezvous, dock, and separate successfully in low-Earth orbit.
  2. Electric Power Transfer: Testing the transfer of electric power between docked spacecraft, a foundational step for future robotic innovations.
  3. Managing a Composite Unit: Showcasing the ability to control and operate the docked spacecraft as a single unit.
  4. Post-Separation Operations: Evaluating the functionality of payloads and systems after the spacecraft undock.

The Mission in Focus: SpaDeX

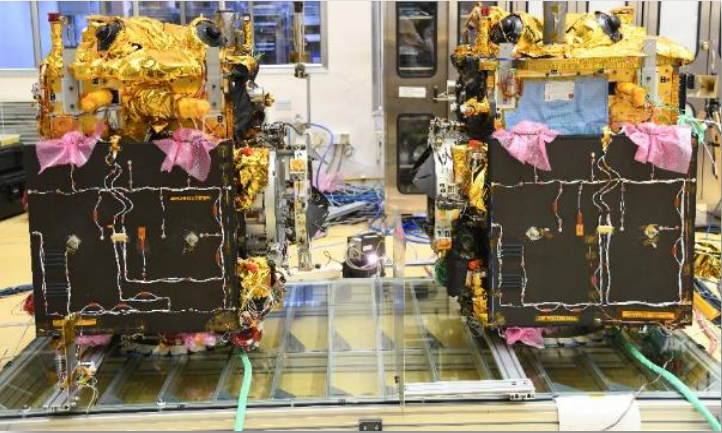
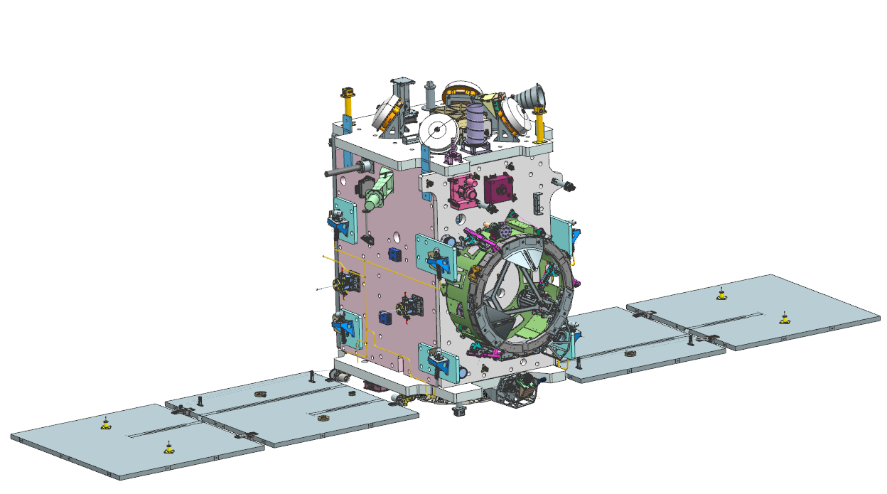
The Space Docking Experiment will be conducted using two indigenously developed satellites named SDX01 (Chaser) and SDX02 (Target). Each weigh 220 kg and is equipped with advanced sensors and navigation systems.

Here’s a step-by-step breakdown of the mission:

  1. Launch: Both satellites will be launched together on a PSLV-C60 rocket into a circular orbit 470 kilometres above Earth.
  2. Separation: Once in orbit, the two satellites will separate and drift apart by 10–20 kilometres, simulating independent spacecraft.
  3. Rendezvous and Approach: Over 24 hours, the Chaser will execute a series of calculated operations to approach the Target. Using advanced navigation and sensor systems, it will align itself precisely with the Target satellite.
  4. Docking: At a distance of 3 meters, the Chaser will initiate the docking sequence and this mechanism will lock the two satellites together.
  5. Undocking:
    After demonstrating a successful dock, the satellites will separate and continue their individual missions, which include Earth observation and radiation monitoring.


    Technology Behind SpaDeX

The Space Docking Experiment is a showcase of cutting-edge engineering, featuring several innovative technologies:

Compact Docking Mechanism

The docking system is designed for efficiency and reliability. It measures just 450 mm, and operates with only two motors, unlike more complex systems used by other space agencies.

Advanced Sensors for Precision Navigation

The docking process depends on precise measurements and alignment, made possible by state-of-the-art sensors:

  • Laser Range Finder (LRF): Tracks distances between 6 km and 200 meters.
  • Rendezvous Sensors (RS): Provides relative positioning from 2 km to 10 meters.
  • Proximity and Docking Sensor (PDS): Handles close-range operations, from 30 meters to 0.4 meters.
  • Video Monitor and Entry Sensors: Ensures visual accuracy during the final approach.

Autonomous Operations

Using differential GNSS-based positioning and inter-satellite communication links (ISL), the Chaser calculates its relative velocity and position with high accuracy. Intelligent navigation algorithms, such as V-bar navigation, ensure smooth and safe operations throughout the mission.

Power Transfer Capability

One of the mission’s highlights is the ability to transfer power between docked spacecraft. This capability is essential for future missions involving robotic systems or prolonged human presence in space.

Why SpaDeX Matters for India
SpaDeX is not just a technical demonstration; it’s a stepping stone to transformative advancements in space exploration. Here are some of its broader implications:

  1. Modular Space Stations: India could use docking technology to develop its own space station or contribute to international projects. With SpaDeX, the foundation for such capabilities is firmly laid.
  2. Reusable Spacecraft Systems: Docking could make reusable spacecraft viable by enabling in-orbit refuelling and maintenance. This would reduce mission costs significantly.
  3. Future Exploration Missions: The docking mechanism empowers the spacecraft to dock with orbiters around other celestial bodies or to assemble larger systems in orbit.
  4. Commercial Opportunities: Mastery of docking technology enhances India’s standing in the global space market, opening doors for partnerships and commercial missions.

What’s Next for ISRO?
SpaDeX is a stepping stone to even more ambitious projects. With this mission, ISRO is laying the groundwork for:

  • India’s Own Space Station: Expected to be operational by the 2030s, this will require docking technology for assembling and maintaining modular components.
  • Collaborations in Space Exploration: Mastering docking could enable India to participate in international missions, including those involving crewed exploration of the Moon and Mars.
  • Robotic and Human Missions: Whether it’s transferring cargo or docking crewed vehicles, the possibilities are endless once docking becomes a mastered capability.

    The Space Docking Experiment is more than a technological milestone and a testament to ISRO’s vision. By tackling one of the most challenging aspects of space exploration, India is positioning itself as a global leader in advanced space technology.
Categories
Technology

Implementing Biometric Login in React Native: A Comprehensive Guide for iOS

Implementing Biometric Login in React Native: A Comprehensive Guide for iOS

Biometric authentication has become an essential feature for mobile applications, providing users with a convenient and secure way to access their accounts. With biometrics, users can authenticate using Face ID, Touch ID, or fallback to device passcodes. This guide explains how to implement biometric login in a React Native application by bridging native iOS code with your React Native app.

Why Biometric Authentication?

In today’s digital landscape, security and user experience are paramount. Biometric authentication offers:

  • Quick and seamless login experience.
  • Enhanced security compared to traditional password methods.
  • Support for multiple authentication types (Face ID, Touch ID, device credentials).

    What You’ll Learn
  • How to check biometric authentication availability on iOS devices.
  • How to implement biometric authentication with a fallback to device credentials.
  • How to bridge native iOS code with React Native.
  • How to use the functionality in your React Native app.

    Step 1: Permissions Required for Biometric Authentication:
  • iOS requires permission and configuration in your app to access biometric features. Update your app’s Info.plist file to include the following keys:
  • <key>NSFaceIDUsageDescription</key>
  • <string>We use Face ID to authenticate you securely.</string>
  • <key>NSBiometricUsageDescription</key>
  • <string>We use biometric authentication to enhance your security.</string>
  • These keys ensure that your app requests permission from the user to use Face ID or Touch ID.

    Step 2: Checking Biometric Authentication Availability:

    We need to verify whether biometric authentication is supported on the device. This is done using the LAContext class from Apple’s LocalAuthentication framework.

    Native Code (iOS)

Create a method in your native module to check biometric authentication availability:
import LocalAuthentication

import React

@objc(NativeBridge)

class NativeBridge: NSObject {

    @objc

    func checkBiometricAuthAvailable(_ resolve: @escaping RCTPromiseResolveBlock, reject: @escaping RCTPromiseRejectBlock) {

        let context = LAContext()

        var error: NSError?

        let isAvailable = context.canEvaluatePolicy(.deviceOwnerAuthenticationWithBiometrics, error: &error)

        if isAvailable {

            resolve(true)

        } else {

            resolve(false)

        }

    }

}

This method checks if biometric authentication (Face ID or Touch ID) is available on the device and returns a boolean value.

Step 3: Implementing Biometric Authentication:

Now, let’s create a method to authenticate users using biometrics. If biometrics aren’t available, we’ll fallback to device passcodes.

@objc

func authenticateWithBiometric(_ resolve: @escaping RCTPromiseResolveBlock, reject: @escaping RCTPromiseRejectBlock) {

    let context = LAContext()

    let reason = “Authenticate to access your account.”

    context.evaluatePolicy(.deviceOwnerAuthentication, localizedReason: reason) { success, error in

        if success {

            resolve(“AUTH_SUCCESS”)

        } else if let error = error as NSError? {

            let errorCode = error.code

            switch errorCode {

            case LAError.authenticationFailed.rawValue:

                reject(“AUTH_FAILED”, “Authentication failed.”, nil)

            case LAError.userCancel.rawValue:

                reject(“USER_CANCELLED”, “Authentication was cancelled by the user.”, nil)

            case LAError.userFallback.rawValue:

                reject(“USER_FALLBACK”, “User chose to use fallback authentication method.”, nil)

            case LAError.biometryNotAvailable.rawValue:

                reject(“BIOMETRY_NOT_AVAILABLE”, “Biometric authentication is not available.”, nil)

            case LAError.biometryNotEnrolled.rawValue:

                reject(“BIOMETRY_NOT_ENROLLED”, “Biometric authentication is not enrolled.”, nil)

            default:

                reject(“AUTH_ERROR”, “An unknown error occurred.”, nil)

            }

        }

    }

}

This method:

  • Displays the biometric authentication prompt.
  • Authenticates the user with Face ID, Touch ID, or device passcode.
  • Handles success, errors, and user cancellation.

    Step 4: Bridging Native Code with React Native :

To make these methods accessible in React Native, create a bridging module.
NativeBridge.m

#import “React/RCTBridgeModule.h”

@interface RCT_EXTERN_MODULE(NativeBridge, NSObject)

RCT_EXTERN_METHOD(checkBiometricAuthAvailable: (RCTPromiseResolveBlock)resolve reject: (RCTPromiseRejectBlock)reject)

RCT_EXTERN_METHOD(authenticateWithBiometric: (RCTPromiseResolveBlock)resolve reject: (RCTPromiseRejectBlock)reject)

@end


Step 5: Register the Native Module:

Ensure the module is registered in your iOS app.
AppDelegate.swift

@UIApplicationMain

class AppDelegate: UIResponder, UIApplicationDelegate {

    …

    // Ensure React Native bridge is initialized properly

}

Step 6: React Native Integration:

In your React Native app, create utility functions to call the native methods.

import { NativeModules } from ‘react-native’;

export const checkBiometricAuthAvailability = async () => {

  try {

    const isAvailable = await NativeModules.NativeBridge.checkBiometricAuthAvailable();

    return isAvailable;

  } catch (error) {

    return false;

  }

};

export const authenticateWithBiometric = async () => {

  try {

    const result = await NativeModules.NativeBridge.authenticateWithBiometric();

    return result === ‘AUTH_SUCCESS’;

  } catch (error) {

    console.log(‘Authentication Error:’, error);

    return false;
}
};

Step 7: Using Biometric Authentication:

Use these functions in your React Native components to check and authenticate users.

import React, { useState } from ‘react’;

import { View, Button, Text } from ‘react-native’;

import { checkBiometricAuthAvailability, authenticateWithBiometric } from ‘./BiometricUtils’;

const App = () => {

  const [authStatus, setAuthStatus] = useState(”);

  const handleLogin = async () => {

    const isAvailable = await checkBiometricAuthAvailability();

    if (!isAvailable) {

      setAuthStatus(‘Biometric authentication not available.’);

      return;

    }

    const isAuthenticated = await authenticateWithBiometric();

    setAuthStatus(isAuthenticated ? ‘Authenticated!’ : ‘Authentication Failed.’);

  };

  return (

    <View>

      <Button title=”Login with Biometrics” onPress={handleLogin} />

      <Text>{authStatus}</Text>

    </View>

  );

};

export default App;

Next Steps

  • Implement credential storage using Keychain for enhanced security.
  • Add comprehensive error handling and user feedback.
  • Expand the feature to support additional scenarios (e.g., two-factor authentication).

Conclusion

With this guide, you’ve added biometric authentication to your React Native app on iOS, offering users a secure and seamless login experience. Follow similar steps for Android to ensure feature parity across platforms.

Categories
Technology

Implementing Biometric Login in React Native: A Comprehensive Guide

Implementing Biometric Login in React Native: A Comprehensive Guide

Biometric authentication has become an essential feature for mobile applications, providing users with a convenient and secure way to access their accounts.

Biometric login offers a seamless and secure user authentication experience, allowing users to access their accounts with fingerprint, face recognition, or device credentials like PIN or pattern. In this blog post, we’ll walk through implementing biometric login in a React Native application using native code and bridging it with React Native application using Android’s BiometricPrompt API.

Why Biometric Authentication?

In today’s digital landscape, security and user experience are paramount. Biometric authentication offers:

Quick and seamless login experience

Enhanced security compared to traditional password methods

Support for multiple authentication types (fingerprint, face recognition, device credentials)

What You’ll Learn

  • How to check biometric authentication availability on the device.
  • How to implement biometric authentication with fallback to device credentials.
  • How to bridge native code with React Native.
  • How to use the functionality in your React Native app.

Step 1: Permissions Required for Biometric Authentication

To implement biometric authentication in your React Native app, you need to declare specific permissions in the Android AndroidManifest.xml file. These permissions ensure your app can access and use the device’s biometric features, such as fingerprint or face recognition.

Add the following permissions to your AndroidManifest.xml file:

<uses-permission android:name="android.permission.USE_BIOMETRIC" /> 

<uses-permission android:name="android.permission.USE_FINGERPRINT" /> 

Step 2: Checking Biometric Authentication Availability

First, we need to verify whether the device supports biometric authentication or device credentials.

Native Code (Android)

Here’s the native code to check biometric authentication availability using BiometricManager:

@ReactMethod 
public void checkBiometricAuthAvailable(Promise promise) { 
    BiometricManager biometricManager = BiometricManager.from(getReactApplicationContext()); 
 
    int canAuthenticateWithBiometric = biometricManager.canAuthenticate( 
        BiometricManager.Authenticators.BIOMETRIC_STRONG |  
        BiometricManager.Authenticators.BIOMETRIC_WEAK 
    ); 
 
    int canAuthenticateWithCredential = biometricManager.canAuthenticate( 
        BiometricManager.Authenticators.DEVICE_CREDENTIAL 
    ); 
 
    boolean isAuthAvailable = (canAuthenticateWithBiometric == BiometricManager.BIOMETRIC_SUCCESS) ||  
                              (canAuthenticateWithCredential == BiometricManager.BIOMETRIC_SUCCESS); 
 
    promise.resolve(isAuthAvailable); 
}

This method checks if biometric or device credential authentication is supported and returns a boolean value.

Step 3: Implementing Biometric Authentication

Next, we create a method to authenticate users using biometrics. If biometrics aren’t available, we fallback to device credentials (PIN, pattern, etc.).
Native Code (Android)

@ReactMethod 

public void authenticateWithBiometric(Promise promise) { 

    FragmentActivity activity = (FragmentActivity) getCurrentActivity(); 

    if (activity == null) { 

        promise.reject("NO_ACTIVITY", "No activity found"); 

        return; 

    } 

    BiometricManager biometricManager = BiometricManager.from(activity); 

    int canAuthenticateWithBiometric = biometricManager.canAuthenticate( 

        BiometricManager.Authenticators.BIOMETRIC_WEAK 

    ); 

    int canAuthenticateWithDeviceCredential = biometricManager.canAuthenticate( 

        BiometricManager.Authenticators.DEVICE_CREDENTIAL 

    ); 

    if (canAuthenticateWithBiometric != BiometricManager.BIOMETRIC_SUCCESS && 

        canAuthenticateWithDeviceCredential != BiometricManager.BIOMETRIC_SUCCESS) { 

        promise.reject("AUTH_NOT_AVAILABLE", "No authentication methods available"); 

        return; 

    } 

    executor = ContextCompat.getMainExecutor(activity); 

    final int[] attemptCounter = {0}; 

    biometricPrompt = new BiometricPrompt(activity, executor, new BiometricPrompt.AuthenticationCallback() { 

        @Override 

        public void onAuthenticationError(int errorCode, @NonNull CharSequence errString) { 

            promise.reject("AUTH_ERROR", errString.toString()); 

        } 

        @Override 

        public void onAuthenticationSucceeded(@NonNull BiometricPrompt.AuthenticationResult result) { 

            promise.resolve("AUTH_SUCCESS"); 

        } 

        @Override 

        public void onAuthenticationFailed() { 

            attemptCounter[0]++; 

            if (attemptCounter[0] >= 3) { 

                promise.reject("AUTH_FAILED", "Authentication failed after 3 attempts"); 

                biometricPrompt.cancelAuthentication(); 

            } 

        } 

    }); 

    int allowedAuthenticators = (canAuthenticateWithBiometric == BiometricManager.BIOMETRIC_SUCCESS) ? 

        BiometricManager.Authenticators.BIOMETRIC_WEAK | BiometricManager.Authenticators.DEVICE_CREDENTIAL : 

        BiometricManager.Authenticators.DEVICE_CREDENTIAL; 

    try { 

        BiometricPrompt.PromptInfo promptInfo = new BiometricPrompt.PromptInfo.Builder() 

                .setTitle("Unlock to login") 

                .setSubtitle("Just one glance or touch, and you're in!") 

                .setAllowedAuthenticators(allowedAuthenticators) 

                .build(); 

        activity.runOnUiThread(() -> biometricPrompt.authenticate(promptInfo)); 

    } catch (Exception e) { 

        promise.reject("AUTH_ERROR", "Error building prompt: " + e.getMessage()); 

    } 

} 

This method:

Displays the biometric prompt to the user.

Authenticates the user with biometrics or device credentials.

Handles success, error, and failed attempts.

Step 4: Bridging Native Code with React Native

We need to expose the native methods to React Native using a custom native module.

Native Code: NativeBridge

public class NativeBridgePackage implements ReactPackage { 

    @Override 

    public List<ViewManager> createViewManagers(ReactApplicationContext reactContext) { 

        return Collections.emptyList(); 

    } 

    @Override 

    public List<NativeModule> createNativeModules(ReactApplicationContext reactContext) { 

        List<NativeModule> modules = new ArrayList<>(); 

        modules.add(new NativeBridge(reactContext)); 

        return modules; 

    } 

} 


Register the package in MainApplication.java: 

@Override 

protected List<ReactPackage> getPackages() { 

    List<ReactPackage> packages = new PackageList(this).getPackages(); 

    packages.add(new NativeBridgePackage()); 

    return packages; 

} 
 

Step 5: React Native Integration 

In your React Native app, create utility functions to call the native methods: 

import { NativeModules } from 'react-native'; 


export const checkBiometricAuthAvailability = async () => { 

  try { 

    const isAvailable = await NativeModules.NativeBridge.checkBiometricAuthAvailable(); 

    return isAvailable; 

  } catch (error) { 

    return false; 

  } 

}; 


export const authenticateWithBiometric = async () => { 

  try { 

    const result = await NativeModules.NativeBridge.authenticateWithBiometric(); 

    return result === 'AUTH_SUCCESS'; 

  } catch (error) { 

    console.log('Authentication Error:', error); 

    return false; 

  } 

}; 

Use these methods to: 

Check if biometric authentication is available. 

Authenticate users when they press the login button. 
Next Steps 

Implement credential storage with proper encryption 

Add support for iOS biometric authentication 

Create comprehensive error handling and user feedback mechanisms 

Happy coding! 🚀🔐 

References: 

Conclusion 

With the implementation above, you’ve added biometric authentication to your React Native app, providing users with a secure and user-friendly login experience. This guide can serve as a template for enhancing the security features of your app. 

Let us know your thoughts or share your challenges in the comments below! 🚀 

Categories
Technology

Search Engines in Various Programming Languages 

Search Engines in Various Programming Languages 


Search engines play a critical role in web and software applications by providing the ability to efficiently retrieve and display data. Depending on the complexity and size of your data, as well as the language or framework you’re using, there are several search engine solutions to choose from. Below is a comprehensive overview of search engines and their use across various coding languages, focusing on TNTSearch, Elasticsearch, and a few others across different programming environments. 

1. TNTSearch 

TNTSearch is a fast, in-memory search engine typically used in PHP applications and works seamlessly with Laravel via Laravel Scout. It’s lightweight and ideal for small to medium-sized datasets. 

Use Cases 

PHP / Laravel: TNTSearch integrates directly into Laravel applications, especially through Laravel Scout. It’s great for applications where the dataset is moderate, and search speed is important without needing a separate service. 

Pros: 

  • Easy to integrate, particularly with Laravel. 
  • Great for real-time, in-memory searches. 
  • Automatic indexing with minimal setup. 

Cons 

  • Struggles with larger datasets. 
  • Basic search capabilities; not suitable for complex queries. 

Languages: 

PHP: Mainly used with Laravel applications. 

JavaScript: Can be used in combination with search libraries or as part of backend services that handle the logic. 

Example in PHP with Laravel Scout


2. Elasticsearch 

Elasticsearch is one of the most popular full-text search engines and is designed to handle distributed search workloads. It’s highly scalable and can process large amounts of data. Elasticsearch is used across a variety of languages and frameworks due to its advanced search capabilities, flexibility, and ability to handle real-time indexing. 

Use Cases: 

a. Large-scale applications requiring complex full-text search capabilities. 

b. Applications that need to perform advanced filtering, ranking, or faceted search (e.g., eCommerce or enterprise-level apps). 

Pros: 

  • Highly scalable for large datasets. 
  • Supports complex, real-time queries and advanced features. 
  • Open-source with a large community and support ecosystem. 

Cons: 

  • Requires significant setup and maintenance (e.g., server management). 
  • More resource-intensive than lightweight solutions like TNTSearch. 

Languages: 

a). JavaScript (Node.js): Commonly used for backend search services. 

b). Python: Elasticsearch is used in data analytics and scientific research tools. 

c). Ruby: Used for search in Ruby on Rails applications. 

d). Java: Elasticsearch itself is written in Java, so it has deep integration with the Java ecosystem. 

Example in JavaScript (Node.js):

3. Solr 

Solr is another robust search engine built on top of Apache Lucene, and it’s comparable to Elasticsearch in terms of scalability and full-text search capabilities. It has a solid footing in enterprise-level applications and is often used in large-scale deployments that require extensive indexing and querying capabilities. 

Use Cases: 

a. Enterprise search applications. 

b. Websites requiring advanced filtering and faceted search (e.g., eCommerce, document search engines). 

Pros: 

  • Extremely scalable and reliable. 
  • Has faceted search capabilities and is highly configurable. 
  • Open-source, with support for both distributed and non-distributed search. 

Cons: 

  • Complex to set up and manage, similar to Elasticsearch. 
  • Requires dedicated resources for optimal performance. 

Languages: 

  • Java: Solr is built in Java and integrates easily with Java-based applications. 
  • Python: Popular in data-centric applications. 
  • PHP / Symfony: Integrates well with PHP frameworks, though setup is more complex than with Elasticsearch. 

Example in Java: 

4. Sphinx 

Sphinx is an open-source full-text search engine designed for indexing large volumes of text and offering fast searching capabilities. It’s widely used for web-based applications and can index databases or text files. Sphinx is known for being highly efficient, lightweight, and offering scalability for large datasets. 

Use Cases: 

a. Websites with a high volume of content, such as news portals or forums. 

b. Applications that need fast and efficient search indexing for text-heavy data. 

Pros: 

  • High-performance, full-text search engine with low resource requirements. 
  • Supports distributed searching and indexing. 
  • Easy to integrate with SQL databases like MySQL and PostgreSQL. 

Cons: 

  • Limited advanced search features compared to Elasticsearch and Solr. 
  • No built-in support for non-text data or analytics. 

Languages: 

  • PHP: Sphinx integrates well with PHP-based applications through its MySQL protocol. 
  • Python: Used in web applications for quick search indexing. 
  • Ruby: Offers support for Ruby on Rails through third-party libraries. 


5. Whoosh 

Whoosh is a fast, lightweight search engine library written in Python. It is designed for smaller applications where search needs are minimal or moderate. Whoosh provides full-text indexing and search capabilities without the need for an external server, making it suitable for local applications or development environments. 

Use Cases: 

a.Desktop or lightweight web applications. 

b. Projects where simplicity and ease of use are a priority. 

c. Educational tools and smaller search applications. 

Pros: 

  • Written entirely in Python, making it easy to integrate into Python applications. 
  • Lightweight and doesn’t require running a separate server. 
  • Easy to set up and use for small-to-medium-sized projects. 

Cons: 

  • Not suitable for large-scale applications or distributed search. 
  • Limited scalability and performance compared to other engines like Elasticsearch or Solr. 

Languages: 

Python: Exclusively used with Python applications, especially for small-scale search functionalities. 

Example in Python: 

6. Xapian 

Xapian is an open-source search engine library that provides full-text search functionality. It’s known for its flexibility and simplicity and is often used for embedding search features within applications. Xapian supports a range of programming languages and can be integrated into various applications with ease. 

Use Cases: 

a. Embedding search functionality in existing applications or services. 

b. Suitable for medium to large datasets that require fast searching. 

Pros: 

  • Supports advanced indexing and search features like probabilistic ranking. 
  • Multi-language support and bindings for several programming languages. 
  • Provides both Boolean and probabilistic search models. 

Cons: 

  • Steeper learning curve for advanced functionalities. 
  • Not as feature-rich for enterprise-level applications as Elasticsearch or Solr. 

Languages: 

  • C++: Core library written in C++, offering fast performance. 
  • Python: Commonly used in Python applications via the Xapian bindings. 
  • PHP: Integrates well with PHP through native extensions. 

Example in Python: 

7. MeiliSearch 

MeiliSearch is a modern, powerful, and open-source search engine built with simplicity and performance in mind. It’s designed for applications where speed, relevance, and customization are critical. MeiliSearch is known for its low latency and real-time indexing capabilities, making it a great option for dynamic applications. 

Use Cases: 

a. Real-time search for web applications or mobile apps. 

b. Projects that need lightning-fast search responses with custom ranking options. 

Pros: 

  • Extremely fast and responsive, with support for real-time indexing. 
  • Provides customizable ranking algorithms. 
  • Simple to set up and easy to integrate into various environments. 

Cons: 

  • Still evolving and not as mature as Elasticsearch or Solr. 
  • Lacks some advanced analytics and distributed search features. 

Languages: 

  • JavaScript (Node.js): MeiliSearch provides an official JavaScript SDK for easy integration with web applications. 
  • Ruby: Can be used with Ruby on Rails applications for fast search features. 
  • PHP: Supported through community-maintained libraries for Laravel and other PHP frameworks. 

Example in JavaScript (Node.js):

8. Typesense 

Typesense is an open-source search engine optimized for speed and ease of use. It’s designed to handle typo tolerance and fast queries, making it ideal for user-facing applications like eCommerce, documentation sites, or dashboards. Typesense is developer-friendly, offering instant search and autocomplete features out of the box. 

Use Cases: 

a. ECommerce websites with search and filtering options. 

b. User-facing applications where search speed is critical. 

Pros: 

  • Provides typo tolerance and instant search out of the box. 
  • Developer-friendly, with simple APIs for various programming languages. 
  • Designed for real-time, fast performance. 

Cons: 

  • Limited to specific use cases, not as customizable as Solr or Elasticsearch. 
  • Doesn’t handle extremely large datasets as efficiently as other search engines. 

Languages: 

  • JavaScript (Node.js): Official SDK for integrating Typesense into web applications. 
  • Python: Python support for search-based applications and data analysis. 
  • Ruby: Ruby SDK available for Rails applications with fast search requirements. 

Example in JavaScript (Node.js): 

Conclusion 

Search engines come in various forms, each suited to specific needs depending on the size, complexity, and performance requirements of your application. Whether you’re building small to medium-scale applications with TNTSearch or looking for large-scale distributed solutions with Elasticsearch and Solr, there’s a search engine for every programming environment. 

Choosing the right search engine largely depends on your application’s size, the type of data you need to index, and the complexity of your search requirements. Additionally, developer resources and ease of integration into existing environments are also key considerations when selecting the appropriate solution for your needs. 

References 

  1. TNTSearch Documentation 
  1. Elasticsearch Official Documentation 
  1. Apache Solr Official Website 
  1. Sphinx Search Engine 
  1. Whoosh Python Documentation 
  1. Xapian Project 
  1. Typesense Official Website