Categories
Technology

SpaDeX: ISRO’s Next Leap in Space Exploration

SpaDeX: ISRO’s Next Leap in Space Exploration

The Indian Space Research Organisation (ISRO), is preparing to achieve another landmark with its Space Docking Experiment (SpaDeX), set to launch on December 30, 2024. This mission aims to demonstrate India’s capability to perform docking operations in space where two spacecraft meet, connect, and later separate while orbiting Earth.

The mission is significant not only for its technical complexity but also for its implications for India’s future in space exploration. With SpaDeX, India could join an elite group of countries like the United States, Russia, and China that have mastered the space docking.

Team Effort and Preparations

The development of SpaDeX has been a collaborative effort, led by ISRO’s UR Rao Satellite Centre (URSC) and supported by other ISRO centres. After rigorous testing and integration at Ananth Technologies in Bangalore, the spacecraft have been transported to the Satish Dhawan Space Centre (SDSC) for final preparations. Once in orbit, ISRO’s ISTRAC will operate the spacecraft using ground stations.

Mission Objectives

SpaDeX has several key goals:

  1. Proving Rendezvous and Docking Feasibility: Demonstrating that two spacecraft can rendezvous, dock, and separate successfully in low-Earth orbit.
  2. Electric Power Transfer: Testing the transfer of electric power between docked spacecraft, a foundational step for future robotic innovations.
  3. Managing a Composite Unit: Showcasing the ability to control and operate the docked spacecraft as a single unit.
  4. Post-Separation Operations: Evaluating the functionality of payloads and systems after the spacecraft undock.

The Mission in Focus: SpaDeX

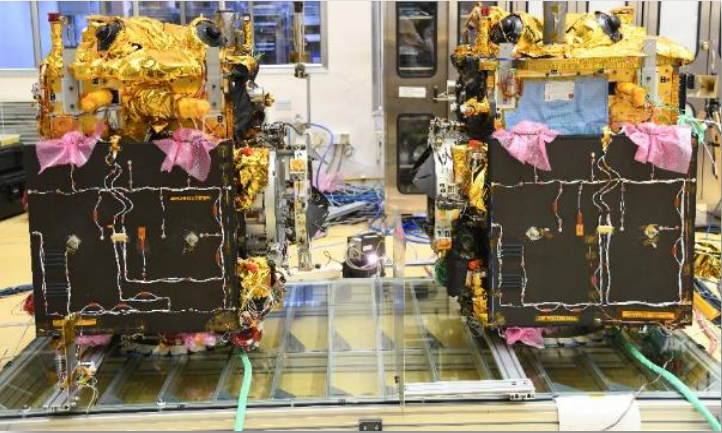
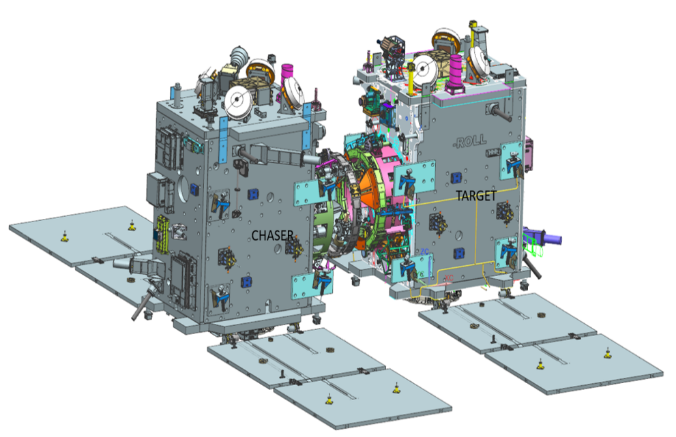
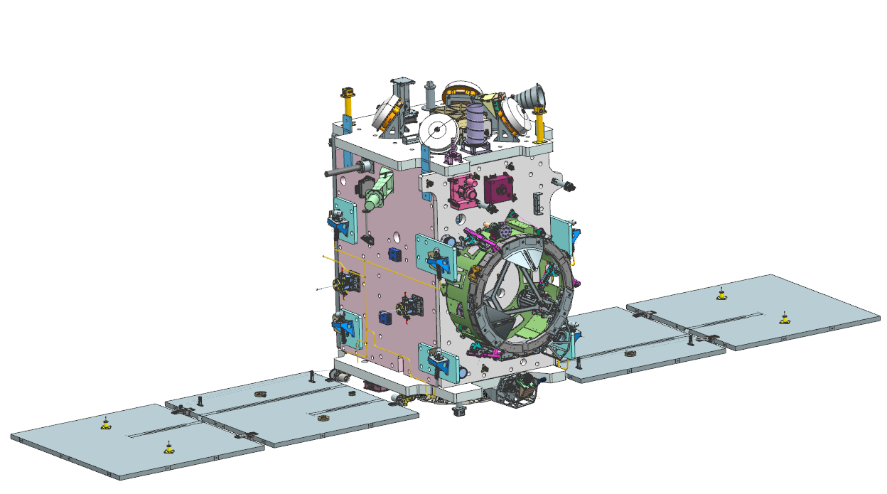
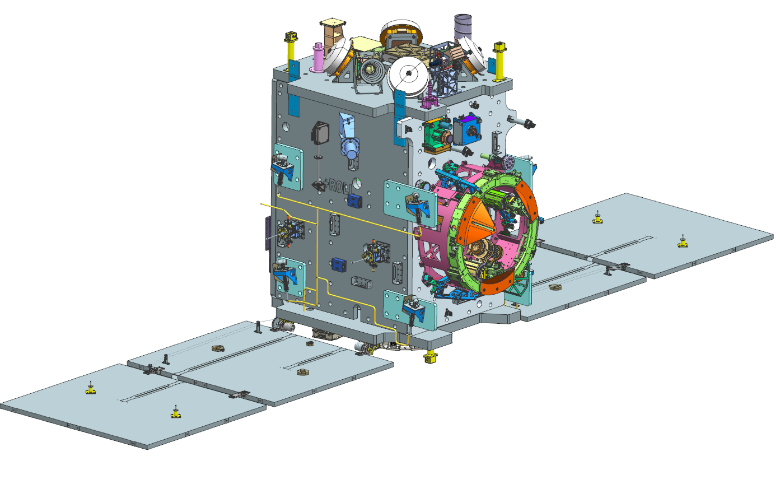
The Space Docking Experiment will be conducted using two indigenously developed satellites named SDX01 (Chaser) and SDX02 (Target). Each weigh 220 kg and is equipped with advanced sensors and navigation systems.

Here’s a step-by-step breakdown of the mission:

  1. Launch: Both satellites will be launched together on a PSLV-C60 rocket into a circular orbit 470 kilometres above Earth.
  2. Separation: Once in orbit, the two satellites will separate and drift apart by 10–20 kilometres, simulating independent spacecraft.
  3. Rendezvous and Approach: Over 24 hours, the Chaser will execute a series of calculated operations to approach the Target. Using advanced navigation and sensor systems, it will align itself precisely with the Target satellite.
  4. Docking: At a distance of 3 meters, the Chaser will initiate the docking sequence and this mechanism will lock the two satellites together.
  5. Undocking:
    After demonstrating a successful dock, the satellites will separate and continue their individual missions, which include Earth observation and radiation monitoring.


    Technology Behind SpaDeX

The Space Docking Experiment is a showcase of cutting-edge engineering, featuring several innovative technologies:

Compact Docking Mechanism

The docking system is designed for efficiency and reliability. It measures just 450 mm, and operates with only two motors, unlike more complex systems used by other space agencies.

Advanced Sensors for Precision Navigation

The docking process depends on precise measurements and alignment, made possible by state-of-the-art sensors:

  • Laser Range Finder (LRF): Tracks distances between 6 km and 200 meters.
  • Rendezvous Sensors (RS): Provides relative positioning from 2 km to 10 meters.
  • Proximity and Docking Sensor (PDS): Handles close-range operations, from 30 meters to 0.4 meters.
  • Video Monitor and Entry Sensors: Ensures visual accuracy during the final approach.

Autonomous Operations

Using differential GNSS-based positioning and inter-satellite communication links (ISL), the Chaser calculates its relative velocity and position with high accuracy. Intelligent navigation algorithms, such as V-bar navigation, ensure smooth and safe operations throughout the mission.

Power Transfer Capability

One of the mission’s highlights is the ability to transfer power between docked spacecraft. This capability is essential for future missions involving robotic systems or prolonged human presence in space.

Why SpaDeX Matters for India
SpaDeX is not just a technical demonstration; it’s a stepping stone to transformative advancements in space exploration. Here are some of its broader implications:

  1. Modular Space Stations: India could use docking technology to develop its own space station or contribute to international projects. With SpaDeX, the foundation for such capabilities is firmly laid.
  2. Reusable Spacecraft Systems: Docking could make reusable spacecraft viable by enabling in-orbit refuelling and maintenance. This would reduce mission costs significantly.
  3. Future Exploration Missions: The docking mechanism empowers the spacecraft to dock with orbiters around other celestial bodies or to assemble larger systems in orbit.
  4. Commercial Opportunities: Mastery of docking technology enhances India’s standing in the global space market, opening doors for partnerships and commercial missions.

What’s Next for ISRO?
SpaDeX is a stepping stone to even more ambitious projects. With this mission, ISRO is laying the groundwork for:

  • India’s Own Space Station: Expected to be operational by the 2030s, this will require docking technology for assembling and maintaining modular components.
  • Collaborations in Space Exploration: Mastering docking could enable India to participate in international missions, including those involving crewed exploration of the Moon and Mars.
  • Robotic and Human Missions: Whether it’s transferring cargo or docking crewed vehicles, the possibilities are endless once docking becomes a mastered capability.

    The Space Docking Experiment is more than a technological milestone and a testament to ISRO’s vision. By tackling one of the most challenging aspects of space exploration, India is positioning itself as a global leader in advanced space technology.
Categories
Technology

Implementing Biometric Login in React Native: A Comprehensive Guide for iOS

Implementing Biometric Login in React Native: A Comprehensive Guide for iOS

Biometric authentication has become an essential feature for mobile applications, providing users with a convenient and secure way to access their accounts. With biometrics, users can authenticate using Face ID, Touch ID, or fallback to device passcodes. This guide explains how to implement biometric login in a React Native application by bridging native iOS code with your React Native app.

Why Biometric Authentication?

In today’s digital landscape, security and user experience are paramount. Biometric authentication offers:

  • Quick and seamless login experience.
  • Enhanced security compared to traditional password methods.
  • Support for multiple authentication types (Face ID, Touch ID, device credentials).

    What You’ll Learn
  • How to check biometric authentication availability on iOS devices.
  • How to implement biometric authentication with a fallback to device credentials.
  • How to bridge native iOS code with React Native.
  • How to use the functionality in your React Native app.

    Step 1: Permissions Required for Biometric Authentication:
  • iOS requires permission and configuration in your app to access biometric features. Update your app’s Info.plist file to include the following keys:
  • <key>NSFaceIDUsageDescription</key>
  • <string>We use Face ID to authenticate you securely.</string>
  • <key>NSBiometricUsageDescription</key>
  • <string>We use biometric authentication to enhance your security.</string>
  • These keys ensure that your app requests permission from the user to use Face ID or Touch ID.

    Step 2: Checking Biometric Authentication Availability:

    We need to verify whether biometric authentication is supported on the device. This is done using the LAContext class from Apple’s LocalAuthentication framework.

    Native Code (iOS)

Create a method in your native module to check biometric authentication availability:
import LocalAuthentication

import React

@objc(NativeBridge)

class NativeBridge: NSObject {

    @objc

    func checkBiometricAuthAvailable(_ resolve: @escaping RCTPromiseResolveBlock, reject: @escaping RCTPromiseRejectBlock) {

        let context = LAContext()

        var error: NSError?

        let isAvailable = context.canEvaluatePolicy(.deviceOwnerAuthenticationWithBiometrics, error: &error)

        if isAvailable {

            resolve(true)

        } else {

            resolve(false)

        }

    }

}

This method checks if biometric authentication (Face ID or Touch ID) is available on the device and returns a boolean value.

Step 3: Implementing Biometric Authentication:

Now, let’s create a method to authenticate users using biometrics. If biometrics aren’t available, we’ll fallback to device passcodes.

@objc

func authenticateWithBiometric(_ resolve: @escaping RCTPromiseResolveBlock, reject: @escaping RCTPromiseRejectBlock) {

    let context = LAContext()

    let reason = “Authenticate to access your account.”

    context.evaluatePolicy(.deviceOwnerAuthentication, localizedReason: reason) { success, error in

        if success {

            resolve(“AUTH_SUCCESS”)

        } else if let error = error as NSError? {

            let errorCode = error.code

            switch errorCode {

            case LAError.authenticationFailed.rawValue:

                reject(“AUTH_FAILED”, “Authentication failed.”, nil)

            case LAError.userCancel.rawValue:

                reject(“USER_CANCELLED”, “Authentication was cancelled by the user.”, nil)

            case LAError.userFallback.rawValue:

                reject(“USER_FALLBACK”, “User chose to use fallback authentication method.”, nil)

            case LAError.biometryNotAvailable.rawValue:

                reject(“BIOMETRY_NOT_AVAILABLE”, “Biometric authentication is not available.”, nil)

            case LAError.biometryNotEnrolled.rawValue:

                reject(“BIOMETRY_NOT_ENROLLED”, “Biometric authentication is not enrolled.”, nil)

            default:

                reject(“AUTH_ERROR”, “An unknown error occurred.”, nil)

            }

        }

    }

}

This method:

  • Displays the biometric authentication prompt.
  • Authenticates the user with Face ID, Touch ID, or device passcode.
  • Handles success, errors, and user cancellation.

    Step 4: Bridging Native Code with React Native :

To make these methods accessible in React Native, create a bridging module.
NativeBridge.m

#import “React/RCTBridgeModule.h”

@interface RCT_EXTERN_MODULE(NativeBridge, NSObject)

RCT_EXTERN_METHOD(checkBiometricAuthAvailable: (RCTPromiseResolveBlock)resolve reject: (RCTPromiseRejectBlock)reject)

RCT_EXTERN_METHOD(authenticateWithBiometric: (RCTPromiseResolveBlock)resolve reject: (RCTPromiseRejectBlock)reject)

@end


Step 5: Register the Native Module:

Ensure the module is registered in your iOS app.
AppDelegate.swift

@UIApplicationMain

class AppDelegate: UIResponder, UIApplicationDelegate {

    …

    // Ensure React Native bridge is initialized properly

}

Step 6: React Native Integration:

In your React Native app, create utility functions to call the native methods.

import { NativeModules } from ‘react-native’;

export const checkBiometricAuthAvailability = async () => {

  try {

    const isAvailable = await NativeModules.NativeBridge.checkBiometricAuthAvailable();

    return isAvailable;

  } catch (error) {

    return false;

  }

};

export const authenticateWithBiometric = async () => {

  try {

    const result = await NativeModules.NativeBridge.authenticateWithBiometric();

    return result === ‘AUTH_SUCCESS’;

  } catch (error) {

    console.log(‘Authentication Error:’, error);

    return false;
}
};

Step 7: Using Biometric Authentication:

Use these functions in your React Native components to check and authenticate users.

import React, { useState } from ‘react’;

import { View, Button, Text } from ‘react-native’;

import { checkBiometricAuthAvailability, authenticateWithBiometric } from ‘./BiometricUtils’;

const App = () => {

  const [authStatus, setAuthStatus] = useState(”);

  const handleLogin = async () => {

    const isAvailable = await checkBiometricAuthAvailability();

    if (!isAvailable) {

      setAuthStatus(‘Biometric authentication not available.’);

      return;

    }

    const isAuthenticated = await authenticateWithBiometric();

    setAuthStatus(isAuthenticated ? ‘Authenticated!’ : ‘Authentication Failed.’);

  };

  return (

    <View>

      <Button title=”Login with Biometrics” onPress={handleLogin} />

      <Text>{authStatus}</Text>

    </View>

  );

};

export default App;

Next Steps

  • Implement credential storage using Keychain for enhanced security.
  • Add comprehensive error handling and user feedback.
  • Expand the feature to support additional scenarios (e.g., two-factor authentication).

Conclusion

With this guide, you’ve added biometric authentication to your React Native app on iOS, offering users a secure and seamless login experience. Follow similar steps for Android to ensure feature parity across platforms.

Categories
Technology

Implementing Biometric Login in React Native: A Comprehensive Guide

Implementing Biometric Login in React Native: A Comprehensive Guide

Biometric authentication has become an essential feature for mobile applications, providing users with a convenient and secure way to access their accounts.

Biometric login offers a seamless and secure user authentication experience, allowing users to access their accounts with fingerprint, face recognition, or device credentials like PIN or pattern. In this blog post, we’ll walk through implementing biometric login in a React Native application using native code and bridging it with React Native application using Android’s BiometricPrompt API.

Why Biometric Authentication?

In today’s digital landscape, security and user experience are paramount. Biometric authentication offers:

Quick and seamless login experience

Enhanced security compared to traditional password methods

Support for multiple authentication types (fingerprint, face recognition, device credentials)

What You’ll Learn

  • How to check biometric authentication availability on the device.
  • How to implement biometric authentication with fallback to device credentials.
  • How to bridge native code with React Native.
  • How to use the functionality in your React Native app.

Step 1: Permissions Required for Biometric Authentication

To implement biometric authentication in your React Native app, you need to declare specific permissions in the Android AndroidManifest.xml file. These permissions ensure your app can access and use the device’s biometric features, such as fingerprint or face recognition.

Add the following permissions to your AndroidManifest.xml file:

<uses-permission android:name="android.permission.USE_BIOMETRIC" /> 

<uses-permission android:name="android.permission.USE_FINGERPRINT" /> 

Step 2: Checking Biometric Authentication Availability

First, we need to verify whether the device supports biometric authentication or device credentials.

Native Code (Android)

Here’s the native code to check biometric authentication availability using BiometricManager:

@ReactMethod 
public void checkBiometricAuthAvailable(Promise promise) { 
    BiometricManager biometricManager = BiometricManager.from(getReactApplicationContext()); 
 
    int canAuthenticateWithBiometric = biometricManager.canAuthenticate( 
        BiometricManager.Authenticators.BIOMETRIC_STRONG |  
        BiometricManager.Authenticators.BIOMETRIC_WEAK 
    ); 
 
    int canAuthenticateWithCredential = biometricManager.canAuthenticate( 
        BiometricManager.Authenticators.DEVICE_CREDENTIAL 
    ); 
 
    boolean isAuthAvailable = (canAuthenticateWithBiometric == BiometricManager.BIOMETRIC_SUCCESS) ||  
                              (canAuthenticateWithCredential == BiometricManager.BIOMETRIC_SUCCESS); 
 
    promise.resolve(isAuthAvailable); 
}

This method checks if biometric or device credential authentication is supported and returns a boolean value.

Step 3: Implementing Biometric Authentication

Next, we create a method to authenticate users using biometrics. If biometrics aren’t available, we fallback to device credentials (PIN, pattern, etc.).
Native Code (Android)

@ReactMethod 

public void authenticateWithBiometric(Promise promise) { 

    FragmentActivity activity = (FragmentActivity) getCurrentActivity(); 

    if (activity == null) { 

        promise.reject("NO_ACTIVITY", "No activity found"); 

        return; 

    } 

    BiometricManager biometricManager = BiometricManager.from(activity); 

    int canAuthenticateWithBiometric = biometricManager.canAuthenticate( 

        BiometricManager.Authenticators.BIOMETRIC_WEAK 

    ); 

    int canAuthenticateWithDeviceCredential = biometricManager.canAuthenticate( 

        BiometricManager.Authenticators.DEVICE_CREDENTIAL 

    ); 

    if (canAuthenticateWithBiometric != BiometricManager.BIOMETRIC_SUCCESS && 

        canAuthenticateWithDeviceCredential != BiometricManager.BIOMETRIC_SUCCESS) { 

        promise.reject("AUTH_NOT_AVAILABLE", "No authentication methods available"); 

        return; 

    } 

    executor = ContextCompat.getMainExecutor(activity); 

    final int[] attemptCounter = {0}; 

    biometricPrompt = new BiometricPrompt(activity, executor, new BiometricPrompt.AuthenticationCallback() { 

        @Override 

        public void onAuthenticationError(int errorCode, @NonNull CharSequence errString) { 

            promise.reject("AUTH_ERROR", errString.toString()); 

        } 

        @Override 

        public void onAuthenticationSucceeded(@NonNull BiometricPrompt.AuthenticationResult result) { 

            promise.resolve("AUTH_SUCCESS"); 

        } 

        @Override 

        public void onAuthenticationFailed() { 

            attemptCounter[0]++; 

            if (attemptCounter[0] >= 3) { 

                promise.reject("AUTH_FAILED", "Authentication failed after 3 attempts"); 

                biometricPrompt.cancelAuthentication(); 

            } 

        } 

    }); 

    int allowedAuthenticators = (canAuthenticateWithBiometric == BiometricManager.BIOMETRIC_SUCCESS) ? 

        BiometricManager.Authenticators.BIOMETRIC_WEAK | BiometricManager.Authenticators.DEVICE_CREDENTIAL : 

        BiometricManager.Authenticators.DEVICE_CREDENTIAL; 

    try { 

        BiometricPrompt.PromptInfo promptInfo = new BiometricPrompt.PromptInfo.Builder() 

                .setTitle("Unlock to login") 

                .setSubtitle("Just one glance or touch, and you're in!") 

                .setAllowedAuthenticators(allowedAuthenticators) 

                .build(); 

        activity.runOnUiThread(() -> biometricPrompt.authenticate(promptInfo)); 

    } catch (Exception e) { 

        promise.reject("AUTH_ERROR", "Error building prompt: " + e.getMessage()); 

    } 

} 

This method:

Displays the biometric prompt to the user.

Authenticates the user with biometrics or device credentials.

Handles success, error, and failed attempts.

Step 4: Bridging Native Code with React Native

We need to expose the native methods to React Native using a custom native module.

Native Code: NativeBridge

public class NativeBridgePackage implements ReactPackage { 

    @Override 

    public List<ViewManager> createViewManagers(ReactApplicationContext reactContext) { 

        return Collections.emptyList(); 

    } 

    @Override 

    public List<NativeModule> createNativeModules(ReactApplicationContext reactContext) { 

        List<NativeModule> modules = new ArrayList<>(); 

        modules.add(new NativeBridge(reactContext)); 

        return modules; 

    } 

} 


Register the package in MainApplication.java: 

@Override 

protected List<ReactPackage> getPackages() { 

    List<ReactPackage> packages = new PackageList(this).getPackages(); 

    packages.add(new NativeBridgePackage()); 

    return packages; 

} 
 

Step 5: React Native Integration 

In your React Native app, create utility functions to call the native methods: 

import { NativeModules } from 'react-native'; 


export const checkBiometricAuthAvailability = async () => { 

  try { 

    const isAvailable = await NativeModules.NativeBridge.checkBiometricAuthAvailable(); 

    return isAvailable; 

  } catch (error) { 

    return false; 

  } 

}; 


export const authenticateWithBiometric = async () => { 

  try { 

    const result = await NativeModules.NativeBridge.authenticateWithBiometric(); 

    return result === 'AUTH_SUCCESS'; 

  } catch (error) { 

    console.log('Authentication Error:', error); 

    return false; 

  } 

}; 

Use these methods to: 

Check if biometric authentication is available. 

Authenticate users when they press the login button. 
Next Steps 

Implement credential storage with proper encryption 

Add support for iOS biometric authentication 

Create comprehensive error handling and user feedback mechanisms 

Happy coding! 🚀🔐 

References: 

Conclusion 

With the implementation above, you’ve added biometric authentication to your React Native app, providing users with a secure and user-friendly login experience. This guide can serve as a template for enhancing the security features of your app. 

Let us know your thoughts or share your challenges in the comments below! 🚀 

Categories
Technology

Search Engines in Various Programming Languages 

Search Engines in Various Programming Languages 


Search engines play a critical role in web and software applications by providing the ability to efficiently retrieve and display data. Depending on the complexity and size of your data, as well as the language or framework you’re using, there are several search engine solutions to choose from. Below is a comprehensive overview of search engines and their use across various coding languages, focusing on TNTSearch, Elasticsearch, and a few others across different programming environments. 

1. TNTSearch 

TNTSearch is a fast, in-memory search engine typically used in PHP applications and works seamlessly with Laravel via Laravel Scout. It’s lightweight and ideal for small to medium-sized datasets. 

Use Cases 

PHP / Laravel: TNTSearch integrates directly into Laravel applications, especially through Laravel Scout. It’s great for applications where the dataset is moderate, and search speed is important without needing a separate service. 

Pros: 

  • Easy to integrate, particularly with Laravel. 
  • Great for real-time, in-memory searches. 
  • Automatic indexing with minimal setup. 

Cons 

  • Struggles with larger datasets. 
  • Basic search capabilities; not suitable for complex queries. 

Languages: 

PHP: Mainly used with Laravel applications. 

JavaScript: Can be used in combination with search libraries or as part of backend services that handle the logic. 

Example in PHP with Laravel Scout


2. Elasticsearch 

Elasticsearch is one of the most popular full-text search engines and is designed to handle distributed search workloads. It’s highly scalable and can process large amounts of data. Elasticsearch is used across a variety of languages and frameworks due to its advanced search capabilities, flexibility, and ability to handle real-time indexing. 

Use Cases: 

a. Large-scale applications requiring complex full-text search capabilities. 

b. Applications that need to perform advanced filtering, ranking, or faceted search (e.g., eCommerce or enterprise-level apps). 

Pros: 

  • Highly scalable for large datasets. 
  • Supports complex, real-time queries and advanced features. 
  • Open-source with a large community and support ecosystem. 

Cons: 

  • Requires significant setup and maintenance (e.g., server management). 
  • More resource-intensive than lightweight solutions like TNTSearch. 

Languages: 

a). JavaScript (Node.js): Commonly used for backend search services. 

b). Python: Elasticsearch is used in data analytics and scientific research tools. 

c). Ruby: Used for search in Ruby on Rails applications. 

d). Java: Elasticsearch itself is written in Java, so it has deep integration with the Java ecosystem. 

Example in JavaScript (Node.js):

3. Solr 

Solr is another robust search engine built on top of Apache Lucene, and it’s comparable to Elasticsearch in terms of scalability and full-text search capabilities. It has a solid footing in enterprise-level applications and is often used in large-scale deployments that require extensive indexing and querying capabilities. 

Use Cases: 

a. Enterprise search applications. 

b. Websites requiring advanced filtering and faceted search (e.g., eCommerce, document search engines). 

Pros: 

  • Extremely scalable and reliable. 
  • Has faceted search capabilities and is highly configurable. 
  • Open-source, with support for both distributed and non-distributed search. 

Cons: 

  • Complex to set up and manage, similar to Elasticsearch. 
  • Requires dedicated resources for optimal performance. 

Languages: 

  • Java: Solr is built in Java and integrates easily with Java-based applications. 
  • Python: Popular in data-centric applications. 
  • PHP / Symfony: Integrates well with PHP frameworks, though setup is more complex than with Elasticsearch. 

Example in Java: 

4. Sphinx 

Sphinx is an open-source full-text search engine designed for indexing large volumes of text and offering fast searching capabilities. It’s widely used for web-based applications and can index databases or text files. Sphinx is known for being highly efficient, lightweight, and offering scalability for large datasets. 

Use Cases: 

a. Websites with a high volume of content, such as news portals or forums. 

b. Applications that need fast and efficient search indexing for text-heavy data. 

Pros: 

  • High-performance, full-text search engine with low resource requirements. 
  • Supports distributed searching and indexing. 
  • Easy to integrate with SQL databases like MySQL and PostgreSQL. 

Cons: 

  • Limited advanced search features compared to Elasticsearch and Solr. 
  • No built-in support for non-text data or analytics. 

Languages: 

  • PHP: Sphinx integrates well with PHP-based applications through its MySQL protocol. 
  • Python: Used in web applications for quick search indexing. 
  • Ruby: Offers support for Ruby on Rails through third-party libraries. 


5. Whoosh 

Whoosh is a fast, lightweight search engine library written in Python. It is designed for smaller applications where search needs are minimal or moderate. Whoosh provides full-text indexing and search capabilities without the need for an external server, making it suitable for local applications or development environments. 

Use Cases: 

a.Desktop or lightweight web applications. 

b. Projects where simplicity and ease of use are a priority. 

c. Educational tools and smaller search applications. 

Pros: 

  • Written entirely in Python, making it easy to integrate into Python applications. 
  • Lightweight and doesn’t require running a separate server. 
  • Easy to set up and use for small-to-medium-sized projects. 

Cons: 

  • Not suitable for large-scale applications or distributed search. 
  • Limited scalability and performance compared to other engines like Elasticsearch or Solr. 

Languages: 

Python: Exclusively used with Python applications, especially for small-scale search functionalities. 

Example in Python: 

6. Xapian 

Xapian is an open-source search engine library that provides full-text search functionality. It’s known for its flexibility and simplicity and is often used for embedding search features within applications. Xapian supports a range of programming languages and can be integrated into various applications with ease. 

Use Cases: 

a. Embedding search functionality in existing applications or services. 

b. Suitable for medium to large datasets that require fast searching. 

Pros: 

  • Supports advanced indexing and search features like probabilistic ranking. 
  • Multi-language support and bindings for several programming languages. 
  • Provides both Boolean and probabilistic search models. 

Cons: 

  • Steeper learning curve for advanced functionalities. 
  • Not as feature-rich for enterprise-level applications as Elasticsearch or Solr. 

Languages: 

  • C++: Core library written in C++, offering fast performance. 
  • Python: Commonly used in Python applications via the Xapian bindings. 
  • PHP: Integrates well with PHP through native extensions. 

Example in Python: 

7. MeiliSearch 

MeiliSearch is a modern, powerful, and open-source search engine built with simplicity and performance in mind. It’s designed for applications where speed, relevance, and customization are critical. MeiliSearch is known for its low latency and real-time indexing capabilities, making it a great option for dynamic applications. 

Use Cases: 

a. Real-time search for web applications or mobile apps. 

b. Projects that need lightning-fast search responses with custom ranking options. 

Pros: 

  • Extremely fast and responsive, with support for real-time indexing. 
  • Provides customizable ranking algorithms. 
  • Simple to set up and easy to integrate into various environments. 

Cons: 

  • Still evolving and not as mature as Elasticsearch or Solr. 
  • Lacks some advanced analytics and distributed search features. 

Languages: 

  • JavaScript (Node.js): MeiliSearch provides an official JavaScript SDK for easy integration with web applications. 
  • Ruby: Can be used with Ruby on Rails applications for fast search features. 
  • PHP: Supported through community-maintained libraries for Laravel and other PHP frameworks. 

Example in JavaScript (Node.js):

8. Typesense 

Typesense is an open-source search engine optimized for speed and ease of use. It’s designed to handle typo tolerance and fast queries, making it ideal for user-facing applications like eCommerce, documentation sites, or dashboards. Typesense is developer-friendly, offering instant search and autocomplete features out of the box. 

Use Cases: 

a. ECommerce websites with search and filtering options. 

b. User-facing applications where search speed is critical. 

Pros: 

  • Provides typo tolerance and instant search out of the box. 
  • Developer-friendly, with simple APIs for various programming languages. 
  • Designed for real-time, fast performance. 

Cons: 

  • Limited to specific use cases, not as customizable as Solr or Elasticsearch. 
  • Doesn’t handle extremely large datasets as efficiently as other search engines. 

Languages: 

  • JavaScript (Node.js): Official SDK for integrating Typesense into web applications. 
  • Python: Python support for search-based applications and data analysis. 
  • Ruby: Ruby SDK available for Rails applications with fast search requirements. 

Example in JavaScript (Node.js): 

Conclusion 

Search engines come in various forms, each suited to specific needs depending on the size, complexity, and performance requirements of your application. Whether you’re building small to medium-scale applications with TNTSearch or looking for large-scale distributed solutions with Elasticsearch and Solr, there’s a search engine for every programming environment. 

Choosing the right search engine largely depends on your application’s size, the type of data you need to index, and the complexity of your search requirements. Additionally, developer resources and ease of integration into existing environments are also key considerations when selecting the appropriate solution for your needs. 

References 

  1. TNTSearch Documentation 
  1. Elasticsearch Official Documentation 
  1. Apache Solr Official Website 
  1. Sphinx Search Engine 
  1. Whoosh Python Documentation 
  1. Xapian Project 
  1. Typesense Official Website