INTRODUCTION: –
Emerging plant-wearable sensors allow for timely communication with plants to understand their physiological status, including temperature, water status, volatile emissions, and plant growth. They play a crucial role in providing data-driven insights to optimize the growing conditions and prevent potential problems, ultimately resulting in higher yields and improved sustainability. Developing these wearables can revolutionize agriculture and horticulture. However, there are remaining challenges in monitoring the chlorophyll content in plants, which is also an important biomarker for plant health.
Chlorophylls, including chlorophyll a and chlorophyll b, are crucial pigments participating in photosynthesis. In the light-dependent reaction of photosynthesis, chlorophyll absorbs light energy and converts it into chemical energy in the form of adenosine triphosphate and nicotinamide adenine dinucleotide phosphate, which are used to assemble carbohydrate molecules in subsequent steps. The chlorophyll content is directly related to photosynthetic
potential and primary production. Moreover, chlorophyll content is proportional to thylakoid nitrogen and is influenced by plant stress and senescence. Compared with current plant-wearable sensors focusing on leaf humidity, temperature, and volatile organic compounds, leaf chlorophyll content can provide more direct and insightful information on chloroplast development, photosynthetic capacity, leaf nitrogen content, or general plant health status.
Why do we need Monitor for Crops?
- Food Security: Ensure stable and sufficient food production.
- Stress Management: Detect and respond to both biotic (e.g., pests, diseases) and abiotic (e.g., drought, temperature) stresses.
- Yield Improvement: Optimize growing conditions to increase crop yield.
What Are Wearable Crop Sensors?
- Wearable crop sensors are devices attached directly to different parts of plants (like leaves, stems, or roots) to monitor various aspects of plant health and growth in real-time.
Key Advantages of Wearable Sensors:
- Real-time Monitoring: Provide continuous data on crop health.
- Precision: Offer high spatial and temporal resolution compared to remote sensing methods.
- Versatility: Can monitor various types of information (nutrient levels, physiological state, environmental conditions).
Traditional rigid sensors have limitations:
- Can damage plant tissues
- May cause biological rejection
- Not ideal for long-term use
- Emerging flexible sensors offer solutions:
- Better mechanical properties (can bend and stretch)
- Improved biocompatibility
- Suitable for long-term, continuous monitoring
Impact on Agriculture
- Wearable crop sensors, especially flexible ones, are poised to revolutionize agriculture by:
- Enabling precise, real-time crop health monitoring
- Facilitating early detection of stresses
- Supporting data-driven decision-making in farm management
As this technology advances, it promises to play a crucial role in smart agriculture, helping to optimize resource use and improve crop yields in the face of growing global food demands.
Wearable Sensor Technology: –
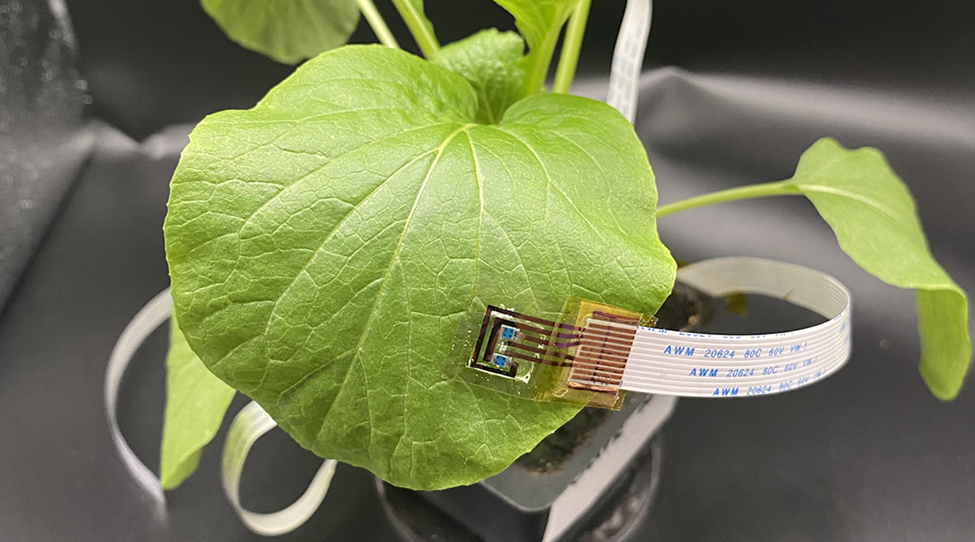
Flexible and wearable chlorophyll meter capable of long-term plant monitoring plant sensors at best price ranging from Rs. 398.00. It employs a monochromatic LED and a pair of symmetric PDs for incident radiation and measurement of the intensity of the reflected light. The chlorophyll content is calculated based on the relationship between leaf chlorophyll content and spectral reflectance. This meter is 1.5 mm (about 0.06 in) thick and weighs 0.2 g, making it 1000 times lighter than the commercial chlorophyll meter. It can be patched onto the upper epidermis of the leaf tightly and realize long-term monitoring with little negative impact on leaves and plants. The block diagram summarizes the critical components of the meter and the read-out circuit. Based on it, a smartphone-controlled platform is developed for users to conduct measurements and collect data easily. The power consumption of the system is 0.035 W. With our plant-patchable chlorophyll meter, the leaf chlorophyll content can be measured more accurately and precisely (r² > 0.9) than the SPAD meter. Moreover, during long-term monitoring (over 2 weeks), chlorophyll losses due to abnormal physiological activities of plants can be detected earlier than the SPAD meter and naked-eye observation of yellowing.
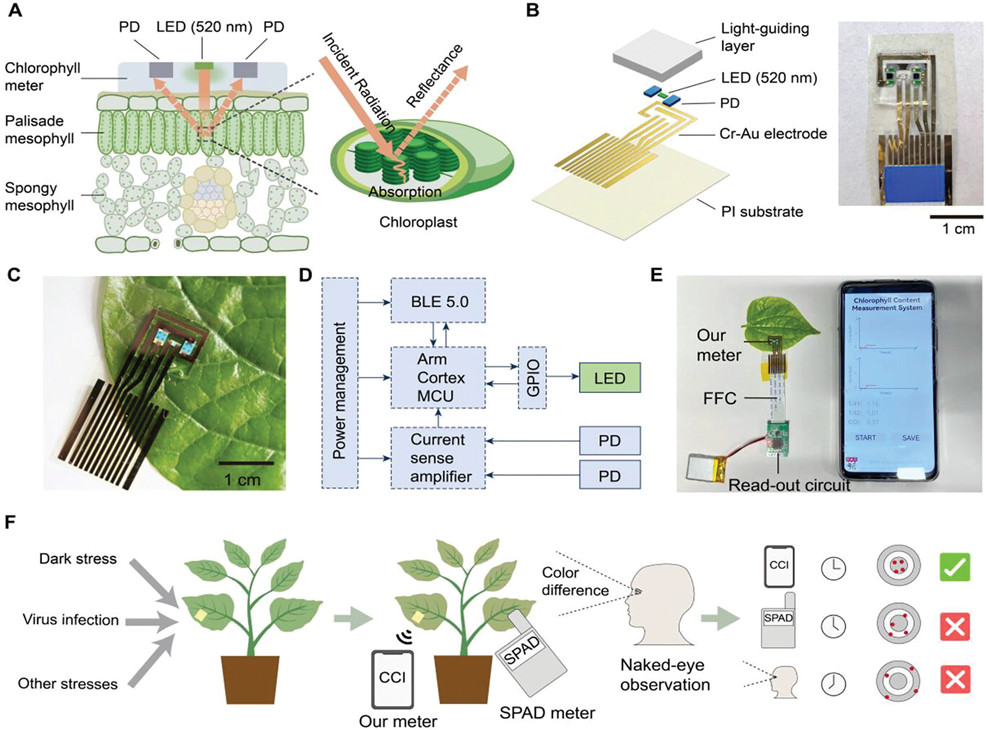
Overview of plant-patchable chlorophyll meter based on reflective optics.
A) Schematics of the working mechanism of the patchable chlorophyll meter.
B) Explosive view and photograph of the patchable chlorophyll meter.
C) Photograph of the wearable chlorophyll meter patched on the leaf.
D) System block diagram of device operation.
E) Wireless and portable platform based on smartphone for rapid and convenient measurements
and data collection. FFC, flexible flat cable.
F) The advantages of the patchable chlorophyll meter for early detection of plant stresses over
naked-eye observation and commercial SPAD meter.
A key molecule for photosynthesis and plant growth, chlorophyll is an important target to monitor as, in simple terms, it collects light to convert water and carbon dioxide into sugar for energy and to build new plant structural components.
Compared with non-contact monitoring methods, wearable sensor has higher time resolution and spatial resolution, which use a mechanical clamping method to fix the sensor on the crop, and directly monitors the growth and growth microenvironment of the crop
How wearable plant sensors help?
Plant growth is accompanied by many intricate and delicate processes, including photosynthesis, transpiration, and respiration. Also, plants are susceptible to several additional environmental factors. Plant growth is negatively impacted when environmentally harmful substances meet the plant. Visual examination and soil testing, which are traditional methods of crop monitoring, would not be able to immediately identify small changes in plant health and biotic stresses that the crops are experiencing in the early phases. Furthermore, time-consuming and tedious traditional methods of plant health assessment are used.
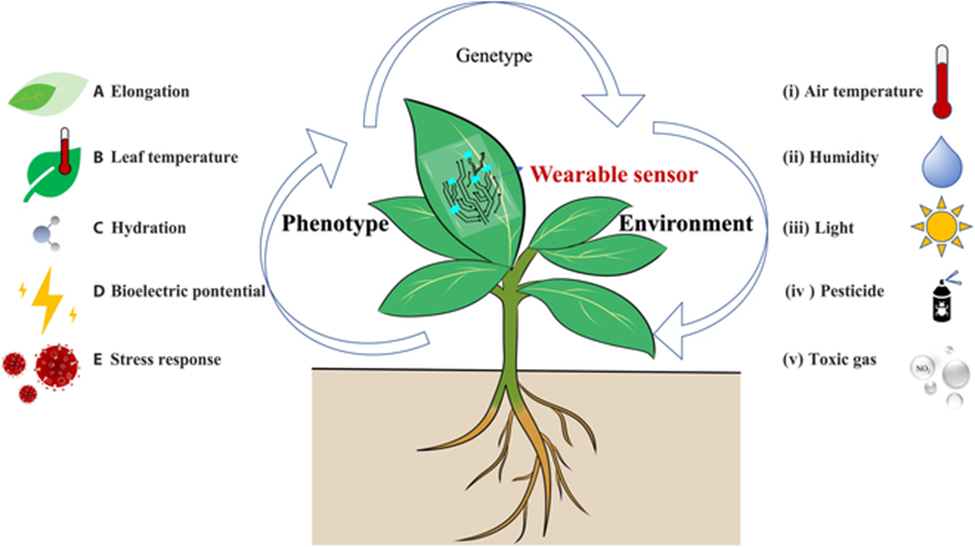
Wearable Sensors for the Measurement of Plant Phenotypes
Traditional plant phenotyping methods are constrained in spatial resolution and accuracy due to their noncontact measurement mode. However, the rapid development of wearable sensors, which features high spatial resolution, multifunctionality, and minimal invasiveness, provides a suitable tool for measuring plant phenotypes. In this section, we review the progress of wearable sensors in measuring plant phenotypes, such as elongation, leaf temperature, hydration, bioelectric potential, and stress response,
Elongation
Elongation is an accurate indicator of plant growth, which aids in understanding the plant growth rhythm and response to environmental conditions. The typical optical phenotyping method for measuring elongation is time-lapse imaging, which enables noninvasive and continuous monitoring. However, this method has limitations, as the optical path can be easily blocked by other growing branches or leaves. However, wearable sensors distributed on the surface of plants allow for in-situ monitoring of tensile strain, which can be converted to plant elongation. Nevertheless, the contact measurement mode requires wearable sensors to have sufficient stretchability to adapt to the continuous growth of plant organs, so that they will not break or restrict the growth of plants.
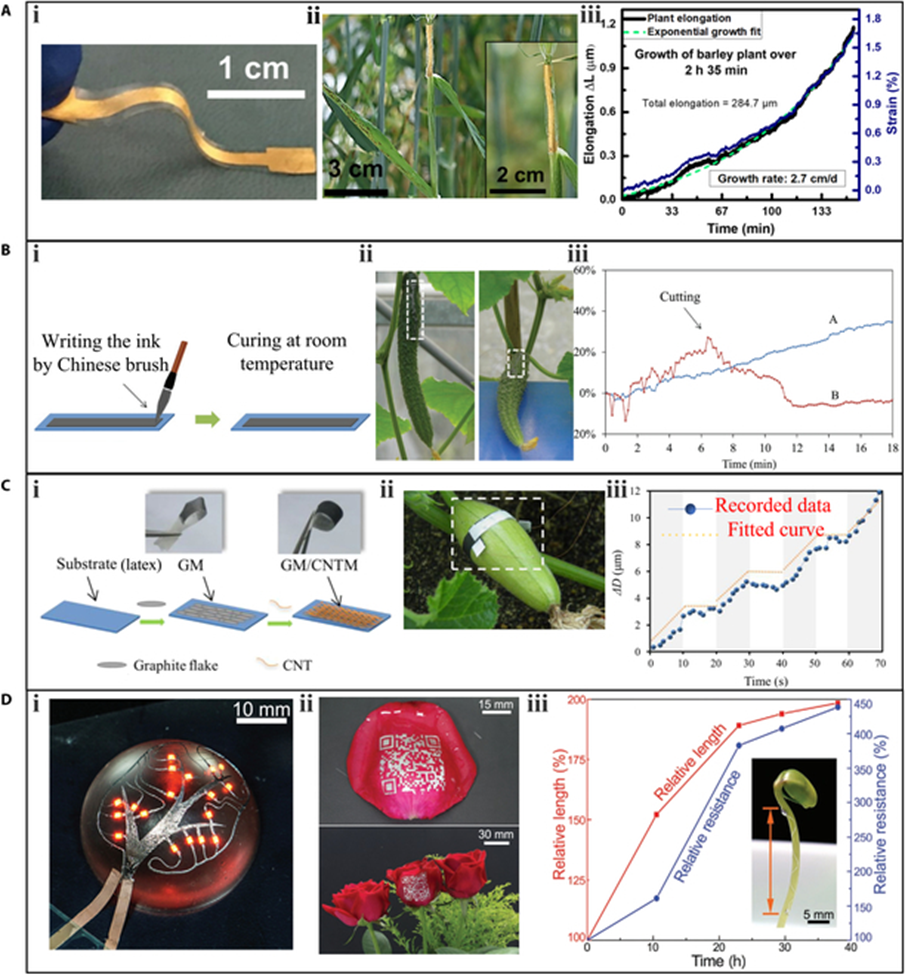
To achieve high stretchability, materials and manufacturing techniques are critical. A stretchable strain sensor that uses flexible, stretchable, and biocompatible materials to monitor plant elongation. a thin Ti/Au metal film was deposited on a stretchable substrate polydimethylsiloxane (PDMS) as a strain sensing material. To eliminate the influence of moisture on resistance, the sensor was encapsulated by another hydrophobic PDMS layer. Notably, the researchers also implemented a buckling technique in which the PDMS layer was pretrained to improve the stretchability of the sensor to 35%. Finally, the sensor showed a linear detection range of 0% to 22% strain, corresponding to an elongation range of 0 to 3.75 mm (about 0.15 in). The sensor’s gauge factor was 3.9, sufficient to monitor the micrometer elongations of plant growth. The strain sensor was anchored on barley stem to measure growth, and the response of the sensor to plant growth was plotted. In the growth period of 2 h and 35 min, the total strain detected was 1.6%, which corresponded to a leaf elongation of 284.7 μm.
Another approach to improving stretchability is embedding conductive materials into elastic polymer composites. A direct-written flexible sensor by mixing graphite powder and chitosan solution in a certain proportion. The resulting stretchable flexible sensor could be directly brushed onto the desired position. To prevent interference from humidity, the sensor was sealed with rubber pieces. Experimental results showed that the sensor could reach a maximum strain of 60%. The sensors were directly written on 2 cucumber fruits in groups A and B to monitor their elongation. The resistance of the sensor in group A continuously increased as the fruit grew. In group B, the resistance of the sensor first increased but then decreased. This transition occurred when the entire fruit was disconnected from the stem, indicating that the fruit stopped growing and started shrinking after being cut.
Latex, a type of stretchable polymer, can provide excellent stretchability for wearable sensors in plant phenotyping. A stretchable latex substrate was coated with graphite ink and carbon nanotube ink to enhance the sensor’s stretchability and gauge factor to 150% and 352, respectively. The resulting sensor was mounted on a Cucurbita pepo fruit for circumferential elongation monitoring. The high sensitivity and temporal resolution of the sensor enabled it to discover an interesting phenomenon: the growth of the Cucurbita pepo follows a rhythmic pattern.The diameter of the pepo increased by 12 μm in 70 s, with a growth period of 10 s and a stagnating period of 10 s, alternately. This strain sensor demonstrated the capability of dynamically measuring elongation at the micrometer scale.
Leaf temperature
There are marked differences between plant leaf temperature and air temperature. Monitoring the leaf temperature and analyzing the temperature difference between the leaf and the air can help determine whether plants are under water stress. Unlike traditional infrared thermal imaging methods, wearable sensors are minimally affected by environmental factors. In leaf temperature measurement research, much effort has been focused on the data transmission of wearable sensors.
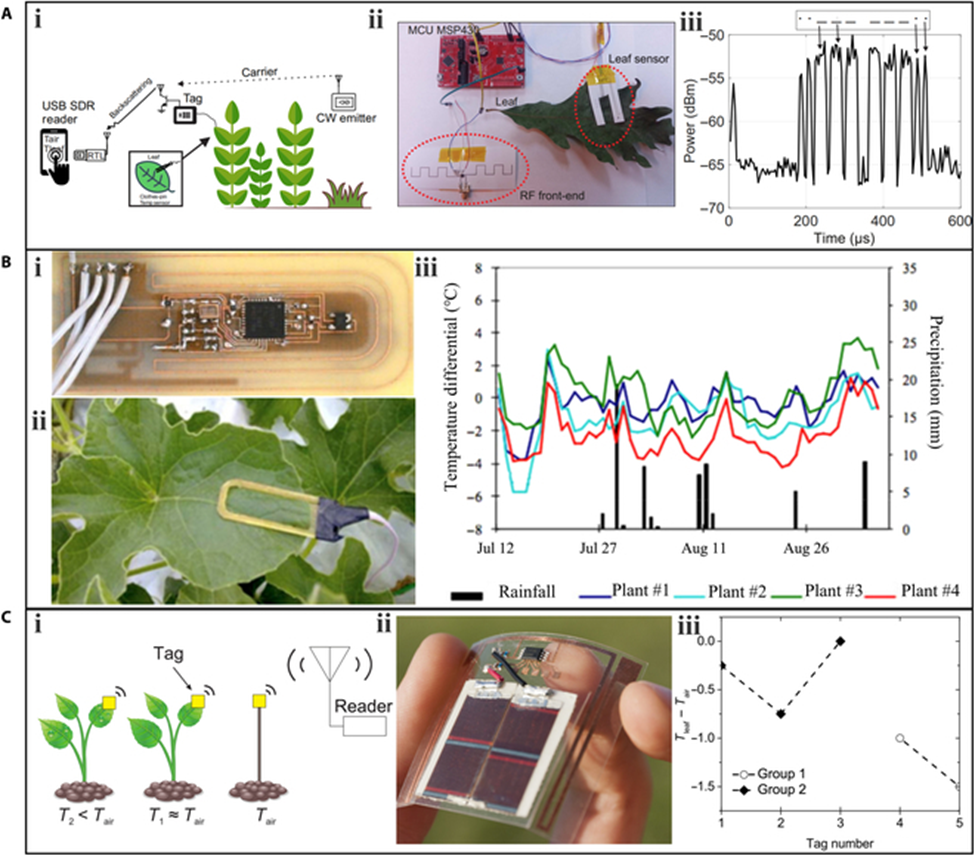
Wireless communication is widely used in agricultural applications due to its convenience and low cost. Daskalakis et al. proposed a tag-sensor node for leaf temperature measurement based on the wireless backscattering principle, which transmits data through an incident radio-frequency signal without requiring a battery or power source. The sensors were fabricated using low-cost inkjet-printing technology with nanoparticle inks and silver epoxy. The study employed a “clothespin” scheme, placing 2 sensors on the top and back of a leaf, respectively, to measure air temperature and leaf temperature. The communication part of the sensor exploited backscatter Morse code modulation on an 868-MHz carrier emitter signal. A Morse code symbol corresponded to a value of air temperature. For example, the Morse symbol corresponded to 28 °C.
Hydration
Water content and water movement are crucial factors in plant growth. In addition to measuring leaf temperature to indirectly reflect whether plants are subjected to water stress, direct measurement of plant hydration is another option. Traditional phenotyping methods for monitoring plant water content include thermal imaging and terahertz imaging, which require laboratory settings. Wearable sensors offer a solution for in-field measurement of plant hydration, but the interface between the sensor and the plant must be robust to accurately acquire hydration information.
One strategy is to use a clamp. In 2012, Atherton et al. proposed a microfabricated thermal sensor device with a thin film microheater for analyzing the moisture content of leaves by monitoring thermal resistance. The sensor was fixed to the leaf using a plastic clamp. Oren et al.also used the clamp strategy, proposing a multiplex graphene oxide (GO)-based relative humidity (RH) sensor to track water transport inside maize plants. The sensor was adhered to the bottom of a 1-mm-deep chamber in acrylic glass, which was fixed onto the leaf’s surface using lightweight plastic clamping slabs and screws. The disadvantage of this clamp strategy is the relatively complicated installation process, and the mechanical compressive force that may damage the clamped plant organs.
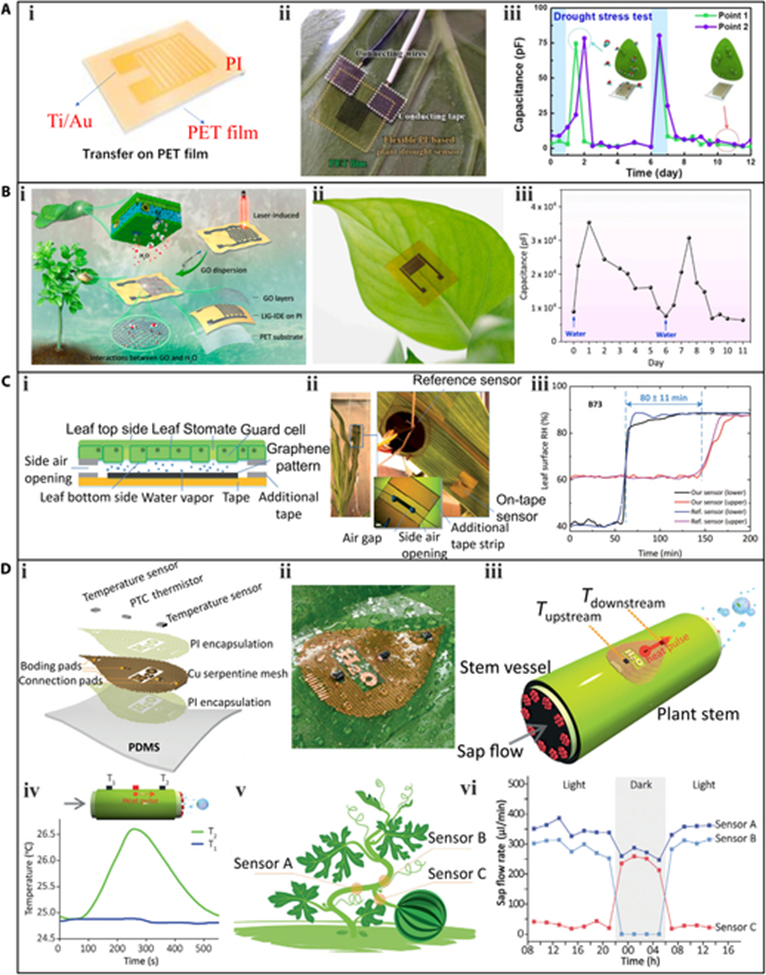
A more convenient and plant-friendly strategy is to use adhesive tape that is nontoxic, although this approach is only viable for wearable sensors with high flexibility. Otherwise, they cannot intimately fit the plant epidermis. Many efforts have been devoted to fabricating flexible hydration sensors. A plant drought sensor is used based on a polyimide (PI) film to monitor the moisture status of tobacco plants. The plant drought sensor was formed by depositing Ti/Au electrodes onto a flexible PI film, which acted as both the sensing element and supporting substrate. The sensor was then peeled from the glass and transferred to a 1-side sticky polyethylene terephthalate film with high flexibility, which facilitated its installation on the plant. The structure of the plant drought sensor,the sensor attached to the lower surface of a Nicotiana tabacum leaf. The moisture released by the transpiration of the leaf increased the capacitance of the PI film, and monitoring the capacitance could therefore deduce the hydration status of the plant. The response of the plant drought sensor capacitance over time during a measurement period, where watering occurred every 6 d, and the capacitance value rapidly increased after each watering.
Bioelectric potentials
Bioelectric potentials are vital for regulating life activities in plants and can change rapidly in response to external stimuli. The conventional method of measuring bioelectric potential involves inserting hard electrodes into tissues, which can cause damage to plants. The use of flexible electrode sensors as a minimally invasive phenotyping tool allows for direct attachment to the plant’s surface to measure bioelectric potentials, causing minimal damage to the plant and enabling continuous measurement.
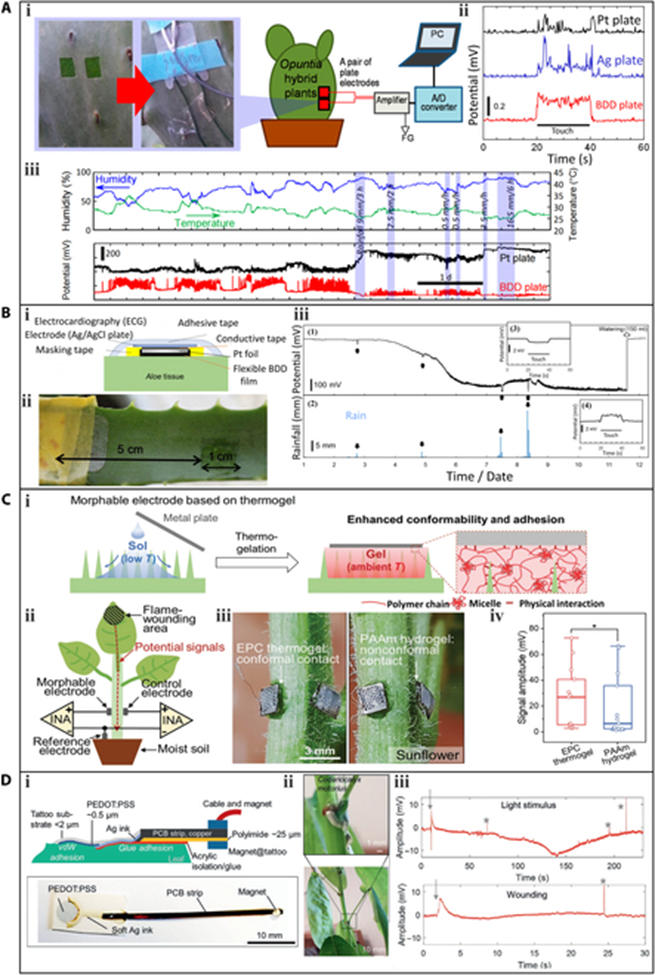
Analogous to the measurement of plant hydration, in order to accurately monitor the bioelectric potentials, it is necessary to ensure that the flexible electrode is tightly integrated with the leaf. However, different plants have varying epidermal structures according to plant physiology, making surface attachment of the flexible electrode and plant different. For plants with smooth skins such as Opuntia and Aloe, Ochiai et al. attached a boron-doped diamond (BDD) electrode sensor to a piece of green phloem tissue to monitor bioelectric potentials. Metal electrode (Pt and Ag) sensors were also characterized for comparison. The BDD sensor could detect obvious changes in bioelectric potentials when a finger touched the hybrid surface of Opuntia or when environmental factors such as temperature and humidity changed. The measurement could be continued for 7 d, indicating the long-term monitoring capability of the BDD sensor. Although the sensitivity of the BDD sensor was 5 to 10 times higher than that of the metal sensors, the signal stability was unsatisfactory.
Stress response
Plants are frequently exposed to biotic or abiotic stresses, such as pathogen infections, ultraviolet, and ground-level ozone, which can hinder plant growth and alter some physiological characteristics. It is crucial to measure the plant’s stress response at an early stage and take timely intervention. Traditional phenotyping methods for measuring stress response are based on visual identification, but these methods may not detect early-stage stress responses. Wearable sensors offer a potential solution to this problem, enabling real-time monitoring and prompt intervention.
Phytophthora infestans (P. infestans) is responsible for causing plant late blight, a destructive disease that affects various plants, including tomato and potato. The infected plants usually emit volatile organic compounds (VOC) gases, such as aldehydes, during the early stage. The use of a gas sensor array attached to leaves for the early-stage identification of late blight caused by P. infestans. The sensor array consists of gold nanoparticles (AuNPs) decorated with reduced GO (rGO) and silver nanowire (AgNW) acting as the sensing layer and electrode, respectively. The sensing layer can form reversible interactions with plant VOCs by hydrogen or halogen bonds, resulting in a resistance increase of the sensor. The sensor array was attached to a tomato leaf using double-sided tape. After 15 h of stable sensor response, the whole plant was sprayed with a suspension of infectious P. infestans sporangia. Small fluctuations in the signal were observed during the first 35 h. A marked increase was observed at 100 h, indicating the emission of characteristic VOC gases induced by the propagation of P. infestans infection. Notably, 2 watering events at 25 and 35 h induced negligible signal interference. After 115 h, the signals gradually stabilized, indicating that the tomato leaf was completely infected by P. infestans. It is worth mentioning that at 115 h, typical symptoms of late blight, including water-soaked lesions and circular gray spots, started to become visible on the leaves. The results confirm the potential of the sensor array for the identification of VOCs during the early stage of P. infestans infection.

Wearable Sensors for Plant Environment Monitoring
The environment is 1 of 2 crucial factors determining plant phenotypes, making the monitoring of the environment an essential aspect of plant phenotyping. Optical methods, including machine vision, spectroscopy, and aerial vehicle, are conventional techniques for monitoring the environment around plants, providing large area coverage. However, these methods are limited for detecting the microenvironment that directly affects plant growth. In contrast, wearable sensors with contact measurement mode can closely adhere to the surface of plants, sensing real-time changes in the microenvironment. This section reviews the progress of wearable sensors for monitoring the environment, including air temperature, air moisture, light, pesticides, and toxic gas, Notably, multimodal sensors are typically integrated to simultaneously monitor these environmental factors.
Air temperature
Air temperature can have a marked impact on photosynthesis, which is a vital process for producing energy and sugar for plant growth. Inadequate or excessive temperature levels can hinder the healthy development of plants.
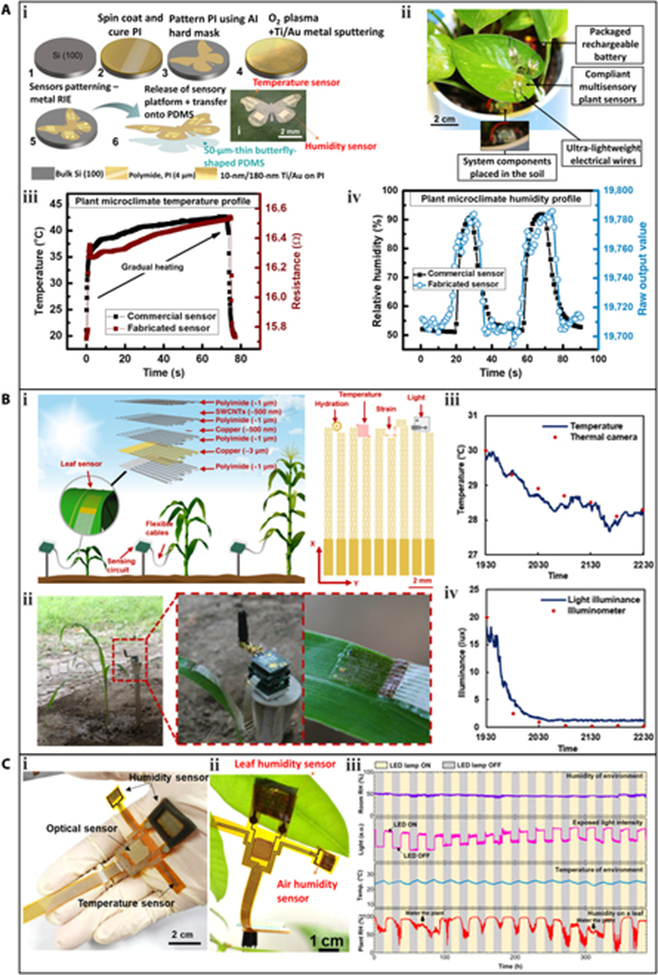
A wearable device that integrates temperature and humidity sensors, which can be deployed on plant surfaces. The flexible sensory platform was fabricated using traditional Si-based microfabrication technology. Electrodes made of ultralight butterfly-shaped PI were sputtered with Au. Among these, the serpentine Au pattern acted as the temperature sensor, as the resistance of Au increases with temperature (0.032 Ω/°C). The sensory platform was placed on the surface of Scindapsus aureus leaves and connected to data acquisition and transmission circuits using ultralight electrical wires and silver epoxy. The developed flexible sensory platform monitored the real-time air temperature around the plant. To confirm the sensing performance of the temperature sensor, the data generated by the system was compared with the data collected by a commercial sensor. As the temperature increased (read by the commercial temperature sensor), the resistance of the developed temperature sensor increased synchronously. The results demonstrated the good reliability of the fabricated sensor.
Multifunctionality is a key advantage of plant wearable sensors. A lightweight and stretchable sensor, capable of monitoring multiple plant phenotypes (elongation and hydration) and environmental factors (air temperature and light). The entire sensor weighs only 17 mg and has a large stretchability of 120%, facilitated by a self-similar serpentine design. These features minimize interference with the growth of the host leaf. The temperature sensing element utilizes a Cu layer with a meander pattern. The sensor was installed on a corn leaf outdoors to monitor real-time air temperature. The recorded temperature data was consistent with data obtained using a thermal imaging camera.
Air moisture
Air humidity is a crucial factor that affects stomatal opening and closing, thereby regulating the plant’s transpiration rate, which controls water absorption and mineral nutrition transport. The moisture in the air also has a direct impact on plant health. If the humidity is too low, plant leaves tend to wilt and detach to conserve water, impeding plant growth. Conversely, if the humidity is too high, plants are vulnerable to insect infestations and foliar and root diseases.
The ultralight butterfly-shaped flexible multisensory platform also includes a humidity sensor with an interdigital shape. In this case, PI serves as the humidity sensing element, and its capacitance increases with humidity, displaying a high sensitivity of 1.6/% RH. When installed on a plant leaf for real-time environmental monitoring, the data collected from the fabricated humidity sensor over 2 periods was consistent with that obtained from a commercial humidity sensor.
The multimodal flexible sensor system depicted had 2 humidity sensors, both of which were fabricated by generating interdigital LIG electrodes on the PI substrate through laser scanning. The humidity sensing element for both sensors was ZnIn2S4 nanosheets deposited on the LIG electrodes. One sensor was exposed to the atmosphere for the measurement of air humidity (room humidity), while the other was attached directly to the lower epidermis of a P. macrocarpa leaf for the measurement of leaf humidity. During the plant’s growth, the air humidity was maintained at a constant level, and the light was periodically switched on and off. The data recorded by the smaller humidity sensor (first row of confirmed the constant level of air humidity, while the data measured by the larger humidity sensor indicated that leaf humidity rapidly increased when the light was on, and stomata opened for photosynthesis. Conversely, the leaf humidity decreased when the light source was turned off.
Light
Light is one of the most important environmental factors for plants. On one hand, light is indispensable for photosynthesis, while on the other hand, excessive light can cause physical damage to plants, such as leaf burning. Therefore, monitoring the light intensity in the environment is crucial.
In the previously mentioned stretchable multimodal sensor, a silicon-based phototransistor was used for light sensing. To improve flexibility and reduce weight, the phototransistor was mechanically polished to a thickness of 20 μm. During real-time monitoring of a corn leaf outdoors, the phototransistor detected the light attenuation during sunset, and the measurement result was consistent with that measured by a commercial illuminometer.
The multimodal flexible sensor system illustrated featured an optical sensor, which was fabricated by screen-printing Ag electrodes onto the PI substrate and depositing ZnIn2S4 nanosheets onto the Ag electrodes as the light sensing element. The optical sensor exhibited a fast response time of approximately 4 ms and could detect light illumination at a frequency of 50 Hz. To simulate day and night, an artificial light source
(18 W) was automatically switched on and off every 12 h, and the switching was accurately detected by the wearable sensor.
Pesticide
Pesticides are widely used in agriculture to protect plants from insect pests. However, they can also leave behind residues that can affect plant phenotypes. Current methods for detecting pesticide residues include mass spectrometry, high-performance liquid chromatography, and gas chromatography. However, these methods require expensive equipment and are not suitable for in-situ detection.
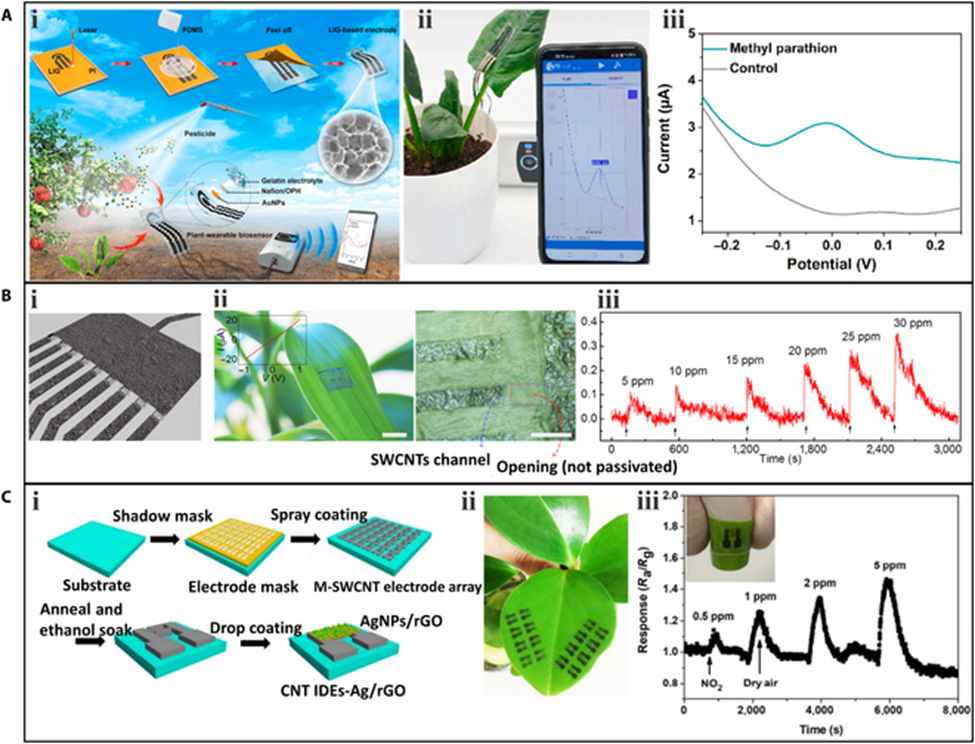
Wearable sensors have been utilized to detect pesticide residues on plants.A wearable sensor that can be directly attached to the plant surface for in-situ detection of organophosphorus pesticides. The fabrication process of the sensor. Serpentine 3-electrode LIG was synthesized on a PI film and transferred to PDMS. The prepared LIG electrodes on the PDMS substrate had good flexibility and stretchability, which can well adapt to the irregular surface of plants. Then, the LIG-based electrodes were modified with organophosphorus hydrolase and AuNPs to enhance the electrochemical performance. The sensor was affixed to the surface of a spinach leaf for in-situ detection. When methyl parathion solution was sprayed onto the leaf surface, the sensor acquired real-time information on pesticide residues and displayed it on a smartphone. A clear peak of p-nitrophenol was observed when the methyl parathion was present compared to the control experiment.
Toxic gas
Toxic gases in the environment, even in small amounts, can cause irreversible damage to plants. Current detection of these gases mainly relies on gas chromatography, which is a costly and time-consuming process. Furthermore, it can be challenging to collect gas samples in the field where airflow disturbance frequently occurs. Wearable sensors can provide a solution to these challenges by performing in-situ measurements of toxic gases.
A gas sensor array based on SWCNT channels and graphite electrodes was used to detect the simulants of sarin nerve agent, dimethyl methylphosphonate (DMMP), which can interfere with the photosynthetic process of plants. The gas sensor array consisted of 9 field-effect sensors. The resistance of the SWCNT channels with openings around them could be modulated by the molecules adsorbed on the surface of the SWCNT donating or withdrawing electrons. Additionally, the gas sensor array exhibited good adhesion and could be easily transferred to planar and nonplanar surfaces. The array was transferred to the leaf surface of a lucky bamboo to sense DMMP gas. When DMMP gas was present, the sensor responded within 5 s, and the response intensity increased with the DMMP concentration.
Another toxic gas, nitrogen dioxide (NO2), can cause plant wilt and leaf yellowing. A sprayed gas sensor array was developed using metallic SWCNTs as the conductive electrode and AgNPs/rGO as the sensing element. The sensor was directly sprayed onto the leaves of living plants for in-situ detection. When NO2 was exerted onto the plant, the sensor’s resistance rapidly increased, and this response was reversible after NO2 was replaced by dry air. As the concentration of NO2 increased, the response of the sensor also increased. The limit of detection is as low as 0.5 ppm. The sprayed sensor has better detection performance compared to conventional metal electrode-based sensors, demonstrating its great potential in the in-situ detection of NO2 around plants.
Challenges and Perspectives
Wearable sensors hold great promise for plant phenotyping due to their high spatial resolution, multifunctionality, and minimal invasiveness. A few commercial plant wearable sensors are already commercially available. For example, AgriHouse Inc. has released a plant wearable sensor named “Leaf Sensor” for the measurement of plant water level. However, several challenges remain in the transition from concept demonstration to large-scale application, including interference with plant growth, weak bonding interface, limited signal type, and small monitoring coverage. We have summarized these challenges and provided potential solutions:
1. Interfering with plant growth. While wearable sensors can be less invasive than some other sampling methods, they can still interfere with plant growth. For example, the weight of the sensor can create pressure on the plant, and the sensor may not grow synchronously with the host plant. Additionally, the sensor can cover stomata, hindering gas exchange, and may reduce light absorption due to its opaqueness. Therefore, to minimize interference plant wearable sensors should be lightweight, soft, stretchable, breathable, and transparent, which can be satisfied from material selection and structural design.
2. Weak bonding interface. To achieve real-time measurements, the wearable sensor must remain attached to the host plant continuously. Thus, a strong bonding interface is required between the sensor and the plant. However, the plant’s epidermis is typically irregular and uneven due to the presence of microstructures such as stomata, mastoid, and villi, which provide limited bonding sites for sensors with smooth surfaces. Previous research has used clamps to fix wearable sensors, but the mechanical pressure can interfere with plant growth. Advanced technology utilizes a morphable thermogel to compensate for the morphological mismatch between the plant and the sensor. More solutions can be inspired by tough hydrogels to address this challenge.
3. Limited signal types. Currently, wearable sensors are electronic devices that convert plant phenotype and environmental information into electrical signals. As a result, only a limited signal type can be collected. For example, current wearable electronic sensors have not been able to measure nitrogen content, a critical phenotype indicator. To obtain more signal types, other devices such as optical and acoustic devices can be integrated into wearable sensors.
4. Small monitoring coverage. While wearable sensors have high spatial resolution, the information they acquire is local. Currently, only a limited number of wearable sensors are attached to a leaf or stem of a plant, which cannot monitor the overall phenotype and environmental information of the host plant, let alone the information of other plants in the same field. To expand the monitoring coverage, numerous wearable sensors are expected to be distributed over the target field to build a dense sensor network system. This requires wearable sensors to be produced at a large scale and low cost.
Conclusion
In this review, we have provided a comprehensive overview of the progress made in the development of wearable sensors for monitoring plant phenotypes (including elongation, leaf temperature, hydration, bioelectric potential, and stress response) and environment (including air temperature, humidity, light, pesticide, and toxic gas). Compared to traditional phenotyping technologies based on optical imaging, wearable sensors have unique advantages, such as high spatial resolution, the ability to easily uncover the impact of environmental factors on phenotypes, and high accuracy in fields, which demonstrate their great potential in plant phenotyping. Although challenges exist, such as interfering with plant growth, weak bonding interfaces, limited signal types, and small monitoring coverage, we have proposed possible solutions. With the continued progress and improvement of wearable sensors, they will markedly accelerate plant phenotyping.
REFRENCES: –
https://youtu.be/i864_c0fvVg